Most migrations from on-prem PostgreSQL to Aurora rely on logical replication or AWS DMS directly from the source. But what if you want to reduce load on your production system, add a control layer, or deal with network constraints?
I recently explored an approach using an intermediary PostgreSQL instance on EC2.
Architecture in brief:
On-prem PostgreSQL (A) → Physical replication → EC2 PostgreSQL (B) → Logical replication (AWS DMS) → Aurora PostgreSQL (C)
This architecture is valid and commonly used in complex migrations, especially when you want to decouple source load, add transformation control, or work around network/security constraints.
we’re essentially proposing a hybrid replication chain:
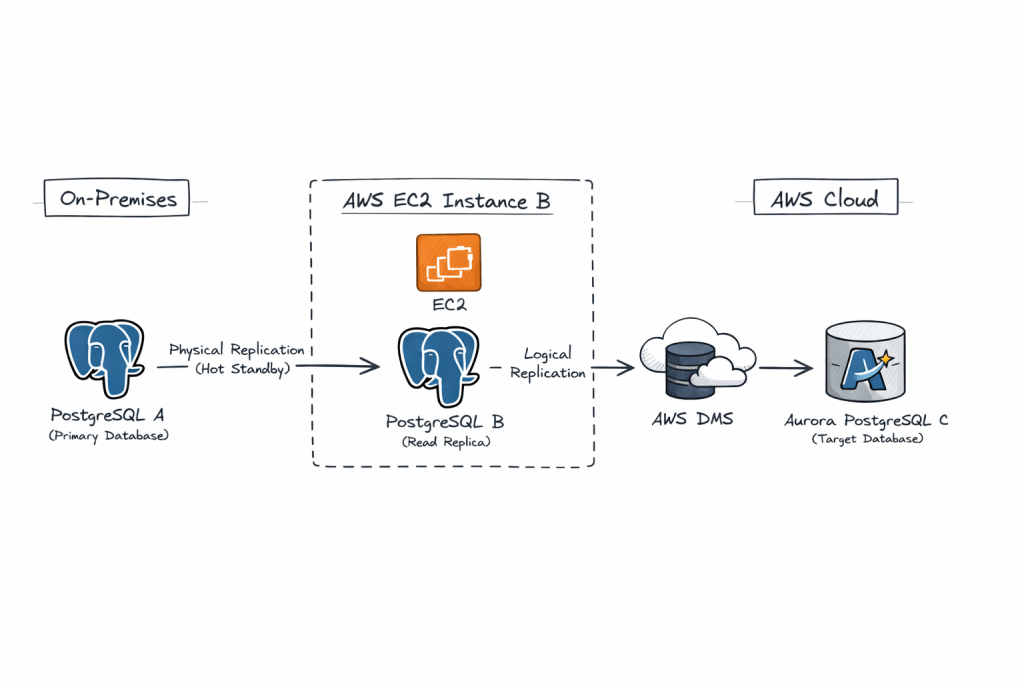
- A (on-prem PostgreSQL) → B (EC2 PostgreSQL) via physical replication
- B (EC2 PostgreSQL) → C (Aurora PostgreSQL) via logical replication / AWS DMS
Why this is interesting:
• Physical replication ensures a low-impact, byte-level copy from the source
• Logical replication from the intermediary allows selective migration and transformation
• The EC2 layer acts as a buffer, isolating production from migration tooling
Key benefits:
• Zero logical decoding overhead on production
• Better control over migration scope
• Improved fault isolation
• Flexible transformation using DMS
Trade-offs:
• Increased replication lag due to chaining
• More operational complexity
• WAL retention needs careful monitoring
• Logical decoding on standby requires newer PostgreSQL versions
This pattern is especially useful in regulated environments or where direct connectivity to AWS is restricted.
It is not the simplest design, but it is a powerful one when used in the right context.
Pre-Requisities on Both A and B
1. Ensure Port 5432 is added to Firewall whitelist on both hosts for ingress and also on the Security Group of the instance
sudo firewall-cmd --zone=public --permanent --add-port=5432/tcpsudo firewall-cmd --reload
2. listen_address in postgresql.conf is set to ‘*’
3. pg_hba.conf is set to allow all hosts
host all all 0.0.0.0/0 scram-sha-256
⚙️ Step-by-Step Implementation
🔹 Phase 1: Setup Physical Replication (A → B)
1. Prepare On-Premise Source (A)
Update postgresql.conf:
wal_level = replicamax_wal_senders = 10wal_keep_size = 2048 #2GBhot_standby = on
Update pg_hba.conf:
host replication replicator <Server-B-IP>/32 scram-sha-256
Create replication user:
CREATE ROLE replicator WITH REPLICATION LOGIN PASSWORD 'password';
2. Take Base Backup to EC2 Postgres Instance B
On EC2 instance (B) Install a fresh PostgreSQL engine or disable the previous Postgresql database for a fresh restore :
sudo systemctl stop postgresql-17mv /var/lib/pgsql/17/data/ /var/lib/pgsql/17/data_old
Take backup on EC2 instance (B) :
pg_basebackup -h <Server-A-IP> -D /var/lib/pgsql/17/data/ -U replicator -P -R -X stream
This:
- Copies data
- Creates
standby.signal - Configures replication automatically
Start B as Standby
sudo systemctl start postgresql-17
Verify:
SELECT * FROM pg_stat_wal_receiver; 15436 | streaming | 0/7000000 | 1 | 0/7384628 | 0/7384628 | 1 | 2026-04-11 12:08:24.757316+00 | 2026-04-11 12:08:24.75985+00 | 0/7384628 | 2026-04-11 12:08:24.75581+00 | | 10.140.1.41 | 5432 | user=replicator password=******** channel_binding=prefer dbname=replication host=10.140.1.41 port=5432 fallback_application_name=walreceiver sslmode=prefer sslnegotiation=postgres sslcompression=0 sslcertmode=allow sslsni=1 ssl_min_protocol_version=TLSv1.2 gssencmode=prefer krbsrvname=postgres gssdelegation=0 target_session_attrs=any load_balance_hosts=disable
🔹 Phase 2: Prepare B for Logical Replication / DMS
This is the critical step 👇
By default, a physical replica cannot act as a logical replication source unless configured properly.
1. Enable Logical Decoding on B
Update on B:
wal_level = logicalmax_replication_slots = 10max_wal_senders = 10
⚠️ Important:
–> Requires restart
–> In PostgreSQL 14+, logical decoding on standby is supported
Create Logical Replication Slot (if using native)
SELECT * FROM pg_create_logical_replication_slot('dms_slot', 'pgoutput');
🔹 Phase 3: Setup AWS DMS (B → C)
1. Create DMS Components
In Amazon Web Services:
- DMS Replication Instance
- Source Endpoint → B
- Target Endpoint → Aurora (C)
2. Configure Source Endpoint (B)
- Enable CDC
- Provide replication slot name (
dms_slot) - Plugin:
pgoutput
3. Configure Target Endpoint (C)
Aurora PostgreSQL:
- Ensure parameter group has:
rds.logical_replication = 1
4. Create DMS Task
- Migration type: Full load + CDC
- Table mapping: select schemas/tables
- Enable:
- Ongoing replication
- LOB handling if needed
5. Start Task
DMS will:
- Do initial full load
- Stream ongoing changes from B
Why This Works
- Physical replication ensures exact byte-level copy
- Logical replication enables selective, flexible migration
- B acts as:
- Load buffer
- Isolation layer
- Transformation point
Advantages
1. Offload Source (A)
- No logical decoding overhead on A
- Reduces production risk
2. Network Isolation
- B can sit inside AWS VPC
- Avoids direct on-prem → Aurora connectivity
3. Migration Flexibility
- Filter tables
- Transform data via DMS
4. Reduced Blast Radius
- Issues in DMS don’t impact A
5. Replay Capability
- You can restart DMS without touching A
Disadvantages / Risks
1. Replication Lag Compounding
- A → B lag
- B → C lag
👉 Total lag increases
2. Logical Decoding on Standby Limitations
- Requires newer PostgreSQL versions (≥14)
- Some edge cases with WAL replay
3. Operational Complexity
- Two replication mechanisms
- More monitoring required
4. Failover Complications
If A fails:
- B becomes primary?
- Logical slots may break
5. WAL Retention Pressure
- Logical slots prevent WAL cleanup
- Risk of disk bloat
6. DMS Limitations
- Doesn’t replicate:
- Sequences perfectly
- Some DDL changes
- Extensions
When This Architecture Makes Sense
Use it when:
✔ Direct A → Aurora is not feasible
✔ You want zero impact on source DB
✔ You need data transformation/filtering
✔ You want controlled cutover with buffer layer
Avoid it when:
✖ Simplicity is priority
✖ Low-latency replication required
✖ PostgreSQL version < 14