Amazon Aurora DSQL First Preview – Create Multi-Region Cluster

Amazon just launched the new Distributed SQ> Aurora Database today.

Aurora DSQL is already available as Public Preview in the US Regions. In this article I want to give you the first preview on creating a cluster and connecting to it with psql client.

Go to this link to get started : https://console.aws.amazon.com/dsql/

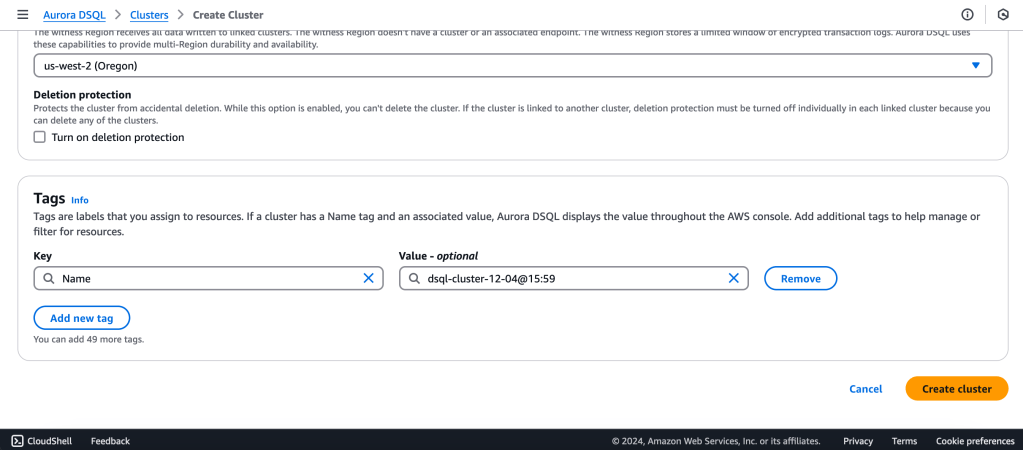
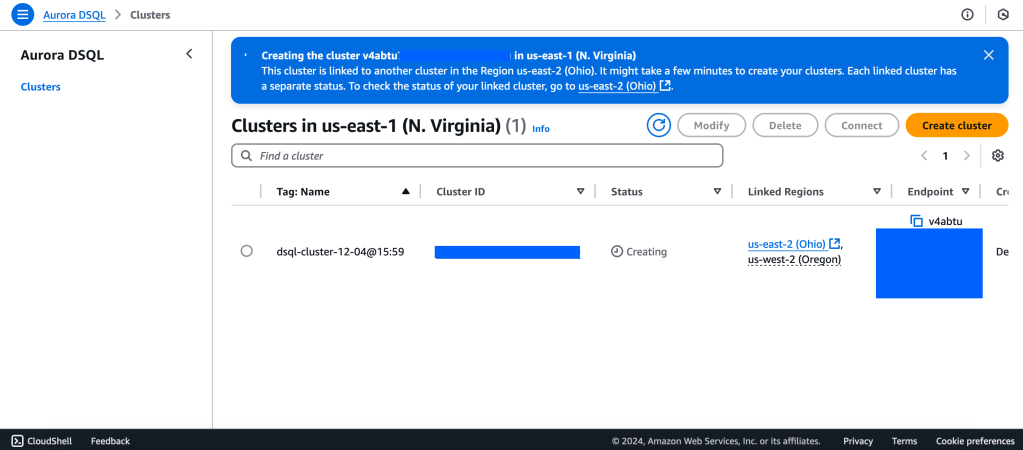
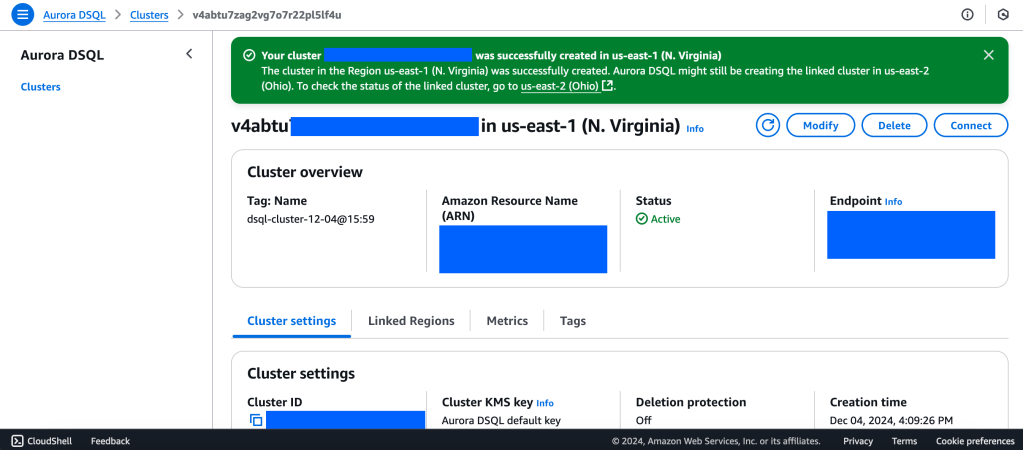
1.Create the DSQL Cluster

We will create a Multi-Region with a Linked region and a Witness region.

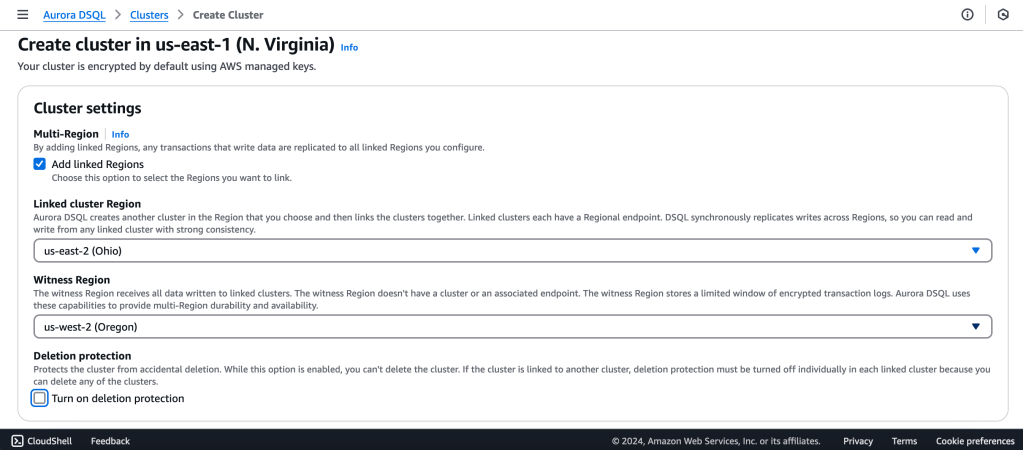
us-east-1 (N Virginia) -> Writer
us-east-2 (Ohio)  -> Writer

us-west-2 (Oregon)  -> Quorum

2. Wait for Cluster Creation to complete to get the Endpoint

3. Generate Auth token to login into Aurora DSQL

https://docs.aws.amazon.com/aurora-dsql/latest/userguide/authentication-token-cli.html

aws dsql generate-db-connect-admin-auth-token \
–expires-in 3600 \
–region us-east-1 \
–hostname <dsql-cluster-endpoint>

The full output will be the password, like below :

v4********4u.dsql.us-east-1.on.aws/?Action=DbConnectAdmin&X-Amz-Algorithm=AWS4-HMAC-SHA256&X-Amz-Credential=AK*****04%2Fus-east-1%2Fdsql%2Faws4_request&X-Amz-Date=202**X-Amz-Expires=3600&X-Amz-SignedHeaders=host&X-Amz-Signature=41e15*****ddfc49

4. Connect with PSQL

https://docs.aws.amazon.com/aurora-dsql/latest/userguide/getting-started.html#getting-started-create-cluster

PGSSLMODE=require \
psql –dbname postgres \
–username admin \
–host v4*******u.dsql.us-east-1.on.aws

Password for user admin: <paste-full-string-of-auth-token-output>
psql (17.2, server 16.5)
SSL connection (protocol: TLSv1.3, cipher: TLS_AES_128_GCM_SHA256, compression: off, ALPN: none)
Type “help” for help.

postgres=>


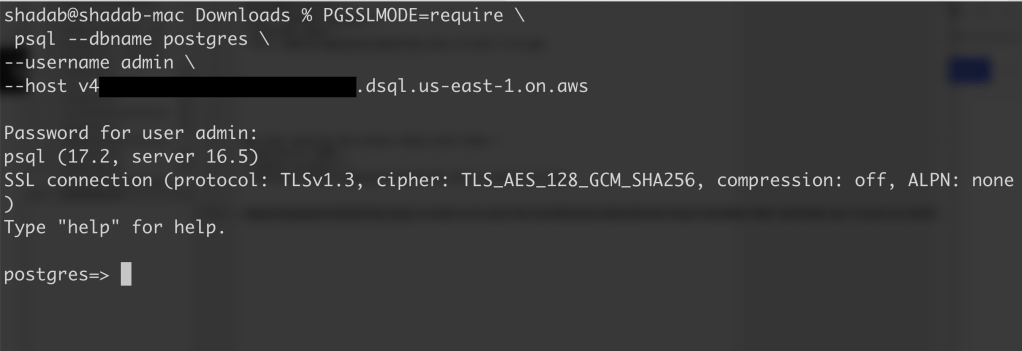
We can connect with a Standard PSQL client!!

5. Create some test objects

https://docs.aws.amazon.com/aurora-dsql/latest/userguide/getting-started.html#getting-started-create-cluster

CREATE SCHEMA app;

CREATE TABLE app.orders (
order_id UUID PRIMARY KEY DEFAULT gen_random_uuid(),
customer_id INTEGER,
product_id INTEGER,
product_description VARCHAR(500),
order_delivery_address VARCHAR(500),
order_date_taken DATE,
order_misc_notes VARCHAR(500)
);

Sample CSV File to Load Data to Orders Table :

\COPY app.orders (order_id,customer_id,product_id,product_description,order_delivery_address,order_date_taken,order_misc_notes) FROM ‘/Users/shadab/Downloads/sample_orders.csv’ DELIMITER ‘,’ CSV HEADER;

/* Try to wrap the command in a single-line */

6. Run SQL Query

[a] Query to Find the Top 5 Customers by Total Orders Within the Last 6 Months

WITH recent_orders AS (
SELECT
customer_id,
product_id,
COUNT(*) AS order_count
FROM
app.orders
WHERE
order_date_taken >= CURRENT_DATE – INTERVAL ‘6 months’
GROUP BY
customer_id, product_id
)
SELECT
customer_id,
SUM(order_count) AS total_orders,
STRING_AGG(DISTINCT product_id::TEXT, ‘, ‘) AS ordered_products
FROM
recent_orders
GROUP BY
customer_id
ORDER BY
total_orders DESC
LIMIT 5;

[b] Query to Find the Most Common Delivery Address Patterns

SELECT
LEFT(order_delivery_address, POSITION(‘,’ IN order_delivery_address) – 1) AS address_prefix,
COUNT(*) AS order_count
FROM
app.orders
GROUP BY
address_prefix
ORDER BY
order_count DESC
LIMIT 10;

[c] Query to Calculate Monthly Order Trends by Product

SELECT
TO_CHAR(order_date_taken, ‘YYYY-MM’) AS order_month,
product_id,
COUNT(*) AS total_orders,
AVG(LENGTH(order_misc_notes)) AS avg_note_length — Example of additional insight
FROM
app.orders
GROUP BY
order_month, product_id
ORDER BY
order_month DESC, total_orders DESC;

7. Check Latency

You can check latency from AWS Cloud Shell using traceroute to your Aurora DSQL endpoints from different regions

us-east-1 (N Virginia)

$ traceroute v*****u.dsql.us-east-1.on.aws

traceroute to v****u.dsql.us-east-1.on.aws (44.223.172.242), 30 hops max, 60 byte packets
1 * * 216.182.237.241 (216.182.237.241) 1.566 ms

ap-southeast-2 (Sydney)

$ traceroute v*****u.dsql.us-east-1.on.aws


traceroute to v********u.dsql.us-east-1.on.aws (44.223.172.242), 30 hops max, 60 byte packets
1 244.5.0.119 (244.5.0.119) 1.224 ms * 244.5.0.115 (244.5.0.115) 5.922 ms
2 100.65.22.0 (100.65.22.0) 4.048 ms 100.65.23.112 (100.65.23.112) 5.203 ms 100.65.22.224 (100.65.22.224) 3.309 ms
3 100.66.9.110 (100.66.9.110) 25.430 ms 100.66.9.176 (100.66.9.176) 7.950 ms 100.66.9.178 (100.66.9.178) 3.966 ms
4 100.66.10.32 (100.66.10.32) 0.842 ms 100.66.11.36 (100.66.11.36) 2.745 ms 100.66.11.96 (100.66.11.96) 3.638 ms
5 240.1.192.3 (240.1.192.3) 0.263 ms 240.1.192.1 (240.1.192.1) 0.278 ms 240.1.192.3 (240.1.192.3) 0.244 ms
6 240.0.236.32 (240.0.236.32) 197.174 ms 240.0.184.33 (240.0.184.33) 197.206 ms 240.0.236.13 (240.0.236.13) 199.076 ms
7 242.3.84.161 (242.3.84.161) 200.891 ms 242.2.212.161 (242.2.212.161) 202.113 ms 242.2.212.33 (242.2.212.33) 197.571 ms
8 240.0.32.47 (240.0.32.47) 196.768 ms 240.0.52.96 (240.0.52.96) 196.935 ms 240.3.16.65 (240.3.16.65) 197.235 ms
9 242.7.128.1 (242.7.128.1) 234.734 ms 242.2.168.185 (242.2.168.185) 203.477 ms 242.0.208.5 (242.0.208.5) 204.263 ms
10 * 100.66.10.209 (100.66.10.209) 292.168 ms *


References:

[1] Aurora DSQL : https://aws.amazon.com/rds/aurora/dsql/features/

[2] Aurora DSQL User Guide : https://docs.aws.amazon.com/aurora-dsql/latest/userguide/getting-started.html#getting-started-create-cluster

[3] Use the AWS CLI to generate a token in Aurora DSQL : https://docs.aws.amazon.com/aurora-dsql/latest/userguide/authentication-token-cli.html

[4] DSQL Vignette: Aurora DSQL, and A Personal Story : https://brooker.co.za/blog/2024/12/03/aurora-dsql.html

——————————————————————————————–

Federated Query from Redshift to Aurora PostgreSQL

Create Public Accessible Redshift Cluster and Aurora PostgreSQL/ RDS PostgreSQL cluster. The RDS PostgreSQL or Aurora PostgreSQL must be in the same VPC as your Amazon Redshift cluster. If the instance is publicly accessible, configure its security group’s inbound rule to: Type: PostgreSQL, Protocol: TCP, Port Range: 5432, Source: 0.0.0.0/0. Otherwise, if the instance is not publicly accessible, you don’t need to configure an inbound rule.

  1. Go to AWS Console > Secrets Manager > Create Secret Managers for RDS Database and Select your PostgreSQL database
  2. Create IAM policy with ARN of above Secrets manager
{
"Version": "2012-10-17",
"Statement": [
{
"Sid": "AccessSecret",
"Effect": "Allow",
"Action": [
"secretsmanager:GetResourcePolicy",
"secretsmanager:GetSecretValue",
"secretsmanager:DescribeSecret",
"secretsmanager:ListSecretVersionIds"
],
"Resource": "arn:aws:secretsmanager:us-east-1:111111111111:secret:federated-query-L9EBau"
},
{
"Sid": "VisualEditor1",
"Effect": "Allow",
"Action": [
"secretsmanager:GetRandomPassword",
"secretsmanager:ListSecrets"
],
"Resource": "*"
}
]
}
  1. Create IAM Redshift customizable role and attach the Above Policy to it.
  2. Attach the Role to your Redshift Cluster
  3. Create External Schema in Redshift
CREATE EXTERNAL SCHEMA IF NOT EXISTS myRedshiftSchema
FROM POSTGRES
DATABASE 'testdb' SCHEMA 'aurora_schema'
URI 'federated-cluster-instance-1.c2txxxxupg1.us-east-1.rds.amazonaws.com' PORT 5432
OPTIONS 'application_name=psql'
IAM_ROLE 'arn:aws:iam::1111111111111:role/federated-query-role'
SECRET_ARN 'arn:aws:secretsmanager:us-east-1:11111111111111:secret:federated-query-L9EBau';
  1. In RDS Aurora PostgreSQL create the schema which will hold the objects for federated query access
testdb=> create schema aurora_schema;
CREATE SCHEMA
testdb=> create table aurora_schema.federatedtable (id int8, name varchar(50), log_txn_date timestamp);
CREATE TABLE
testdb=> insert into aurora_schema.federatedtable values(1,'shadab','2019-12-26 00:00:00');
INSERT 0 1
testdb=> select * from aurora_schema.federatedtable;
id | name | log_txn_date
----+--------+---------------------
1 | shadab | 2019-12-26 00:00:00
(1 row)
  1. Login to your Redshift cluster and Run the Federated Query from Redshift to PostgreSQL —
testdb=# select * from myredshiftschema.federatedtable;
id | name | log_txn_date
----+--------+---------------------
1 | shadab | 2019-12-26 00:00:00
(1 row)
-- Trying out CTAS from Redshift to PostgreSQL --
testdb=# create table test as select * from myredshiftschema.federatedtable;
SELECT
testdb=# select * from test;
id | name | log_txn_date
----+--------+---------------------
1 | shadab | 2019-12-26 00:00:00
testdb=# select pg_last_query_id();
         1251

(1 row)

select * from svl_s3query_summary where query='1251';
-[ RECORD 1 ]-----------+---------------------------
userid | 100
query | 1251
xid | 7338
pid | 11655
segment | 0
step | 0
starttime | 2019-12-27 06:17:30.800652
endtime | 2019-12-27 06:17:30.947853
elapsed | 147201
aborted | 0
external_table_name | PG Subquery
file_format | Text
.
.
.

References:

[1]
Federated Query in Amazon Redshift (Preview) – https://docs.aws.amazon.com/redshift/latest/dg/federated-overview.html
[2]
CREATE EXTERNAL SCHEMA – https://docs.aws.amazon.com/redshift/latest/dg/federated-external-schema.html
[3]
Create a Secret and an IAM Role for Federated Query – https://docs.aws.amazon.com/redshift/latest/dg/federated-create-secret-iam-role.html

Python Script to Create a Data Pipeline Loading Data From RDS Aurora MySQL To Redshift

In this tutorial we will create a Python script which will build a data pipeline to load data from Aurora MySQL RDS to an S3 bucket and copy that data to a Redshift cluster.

One of the assumptions is you have basic understanding of AWS, RDS, MySQL, S3, Python and Redshift. Even if you don’t it’s alright I will explain briefly about each of them to the non-cloud DBA’s

AWS- Amazon Web Services. It is the cloud infrastructure platform from Amazon which can be used to build and host anything from a static website to a globally scalable service like Netflix

RDS – Relational Database Service or RDS or short is Amazons managed relational database service for databases like it’s own Aurora, MySQL, Postgres, Oracle and SQL Server

S3- Simple Storage Service is AWS’s distributed storage which can scale almost infinitely. Data in S3 is stored in Buckets. Think of buckets as Directories but DNS name compliant and cloud hosted

Python – A programming language which is now the defacto standard for data science and engineering

Redshift- AWS’s Petabyte scale Data warehouse which is binary compatible to PostgreSQL but uses a columnar storage engine

The source in this tutorial is a RDS Aurora MySQL database and target is a Redshift cluster. The data is staged in an S3 bucket. With Aurora MySQL you can unload data directly to a S3 bucket but in my script I will offload the table to a local filesystem and then copy it to the S3 bucket. This will give you flexibility in-case you are not using Aurora but a standard MySQL or Maria DB

Environment:

  1. Python 3.7.2 with pip
  2. Ec2 instance with the Python 3.7 installed along with all the Python packages
  3. Source DB- RDS Aurora MySQL 5.6 compatible
  4. Destination DB – Redshift Cluster
  5. Database : Dev , Table : employee in both databases which will be used for the data transfer
  6. S3 bucket for staging the data
  7. AWS Python SDK Boto3

Make sure both the RDS Aurora MySQL and Redshift cluster has security groups which have have IP of the Ec2 instance for inbound connections (Host and Port)

  1. Create the table ’employee’ in both the Aurora and Redshift Clusters

Aurora MySQL 5.6

CREATE TABLE `employee` (
  `id` int(11) NOT NULL,
  `first_name` varchar(45) DEFAULT NULL,
  `last_name` varchar(45) DEFAULT NULL,
  `phone_number` varchar(45) DEFAULT NULL,
  `address` varchar(200) DEFAULT NULL,
  PRIMARY KEY (`id`)
) ENGINE=InnoDB DEFAULT CHARSET=latin1;

Redshift

DROP TABLE IF EXISTS employee CASCADE;

CREATE TABLE employee
(
   id            bigint         NOT NULL,
   first_name    varchar(45),
   last_name     varchar(45),
   phone_number  bigint,
   address       varchar(200)
);

ALTER TABLE employee
   ADD CONSTRAINT employee_pkey
   PRIMARY KEY (id);

COMMIT;

2. Install Python 3.7.2 and install all the packages needed by the script

sudo /usr/local/bin/python3.7 -m pip install boto3
sudo /usr/local/bin/python3.7 -m pip install psycopg2-binary
sudo /usr/local/bin/python3.7 -m pip install pymysql
sudo /usr/local/bin/python3.7 -m pip install json
sudo /usr/local/bin/python3.7 -m pip install pymongo

3. Insert sample data into the source RDS Aurora DB

$ mysql -u awsuser -h shadmha-cls-aurora.ap-southeast-2.rds.amazonaws.com -p dev

INSERT INTO `employee` VALUES (1,'shadab','mohammad','04447910733','Randwick'),(2,'kris','joy','07761288888','Liverpool'),(3,'trish','harris','07766166166','Freshwater'),(4,'john','doe','08282828282','Newtown'),(5,'mary','jane','02535533737','St. Leonards'),(6,'sam','rockwell','06625255252','Manchester');

SELECT * FROM employee;

4. Download and Configure AWS command line interface

The AWS Python SDK boto3 requires AWS CLI for the credentials to connect to your AWS account. Also for uploading the file to S3 we need boto3 functions. Install AWS CLI on Linux and configure it.

$ aws configure
AWS Access Key ID [****************YGDA]:
AWS Secret Access Key [****************hgma]:
Default region name [ap-southeast-2]:
Default output format [json]:

5. Python Script to execute the Data Pipeline (datapipeline.py)

import boto3
import psycopg2
import pymysql
import csv
import time
import sys
import os
import datetime
from datetime import date
datetime_object = datetime.datetime.now()
print ("###### Data Pipeline from Aurora MySQL to S3 to Redshift ######")
print ("")
print ("Start TimeStamp")
print ("---------------")
print(datetime_object)
print ("")


# Connect to MySQL Aurora and Download Table as CSV File
db_opts = {
    'user': 'awsuser',
    'password': '******',
    'host': 'shadmha-cls-aurora.ap-southeast-2.rds.amazonaws.com',
    'database': 'dev'
}

db = pymysql.connect(**db_opts)
cur = db.cursor()

sql = 'SELECT * from employee'
csv_file_path = '/home/centos/my_csv_file.csv'

try:
    cur.execute(sql)
    rows = cur.fetchall()
finally:
    db.close()

# Continue only if there are rows returned.
if rows:
    # New empty list called 'result'. This will be written to a file.
    result = list()

    # The row name is the first entry for each entity in the description tuple.
    column_names = list()
    for i in cur.description:
        column_names.append(i[0])

    result.append(column_names)
    for row in rows:
        result.append(row)

    # Write result to file.
    with open(csv_file_path, 'w', newline='') as csvfile:
        csvwriter = csv.writer(csvfile, delimiter='|', quotechar='"', quoting=csv.QUOTE_MINIMAL)
        for row in result:
            csvwriter.writerow(row)
else:
    sys.exit("No rows found for query: {}".format(sql))


# Upload Generated CSV File to S3 Bucket
s3 = boto3.resource('s3')
bucket = s3.Bucket('mybucket-shadmha')
s3.Object('mybucket-shadmha', 'my_csv_file.csv').put(Body=open('/home/centos/my_csv_file.csv', 'rb'))


#Obtaining the connection to RedShift
con=psycopg2.connect(dbname= 'dev', host='redshift-cluster-1.ap-southeast-2.redshift.amazonaws.com',
port= '5439', user= 'awsuser', password= '*********')

#Copy Command as Variable
copy_command="copy employee from 's3://mybucket-shadmha/my_csv_file.csv' credentials 'aws_iam_role=arn:aws:iam::775888:role/REDSHIFT' delimiter '|' region 'ap-southeast-2' ignoreheader 1 removequotes ;"

#Opening a cursor and run copy query
cur = con.cursor()
cur.execute("truncate table employee;")
cur.execute(copy_command)
con.commit()

#Close the cursor and the connection
cur.close()
con.close()

# Remove the S3 bucket file and also the local file
DelLocalFile = 'aws s3 rm s3://mybucket-shadmha/my_csv_file.csv --quiet'
DelS3File = 'rm /home/centos/my_csv_file.csv'
os.system(DelLocalFile)
os.system(DelS3File)


datetime_object_2 = datetime.datetime.now()
print ("End TimeStamp")
print ("-------------")
print (datetime_object_2)
print ("")

6. Run the Script or Schedule in Crontab as a Job

$ python3.7 datapipeline.py

Crontab to execute Job daily at 10:30 am

30 10 * * * /usr/local/bin/python3.7 /home/centos/datapipeline.py &>> /tmp/datapipeline.log

7. Check the table in destination Redshift Cluster and all the records should be visible their

SELECT * FROM employee;


This tutorial was done using a small table and very minimum data. But with S3’s distributed nature and massive scale and Redshift as a Data warehouse you can build data pipelines for very large datasets. Redhsift being an OLAP database and Aurora OLTP, many real-life scenarios requires offloading data from your OLTP apps to data warehouses or data marts to perform Analytics on it.

AWS also has an excellent managed solution called Data Pipelines which can automate the movement and transform of Data. But many a times for developing customized solutions Python is the best tool for the job.

Enjoy this script and please let me know in your comments or on Twitter (@easyoradba) if you have any issues or what else would you like me to post for data engineering.