
Github link for MCP Server : https://github.com/shadabshaukat/postgres-mcp-server/
Helping Enterprise DBA's Transition to the Cloud
Github link for MCP Server : https://github.com/shadabshaukat/postgres-mcp-server/
Most migrations from on-prem PostgreSQL to Aurora rely on logical replication or AWS DMS directly from the source. But what if you want to reduce load on your production system, add a control layer, or deal with network constraints?
I recently explored an approach using an intermediary PostgreSQL instance on EC2.
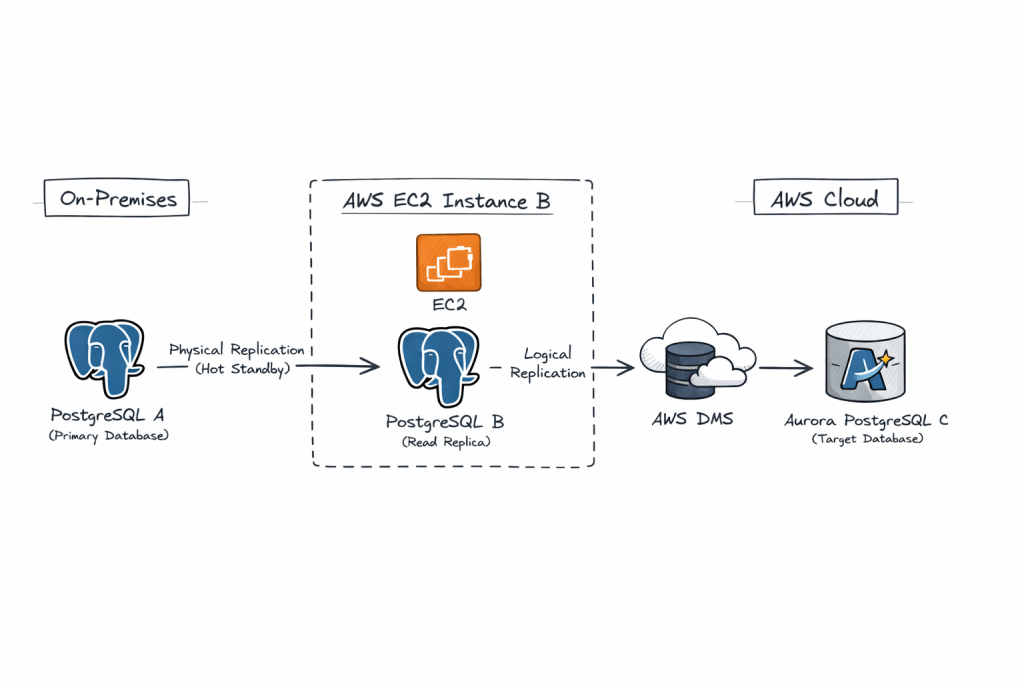
Architecture in brief:
On-prem PostgreSQL (A) → Physical replication → EC2 PostgreSQL (B) → Logical replication (AWS DMS) → Aurora PostgreSQL (C)
This architecture is valid and commonly used in complex migrations, especially when you want to decouple source load, add transformation control, or work around network/security constraints.
we’re essentially proposing a hybrid replication chain:
Why this is interesting:
• Physical replication ensures a low-impact, byte-level copy from the source
• Logical replication from the intermediary allows selective migration and transformation
• The EC2 layer acts as a buffer, isolating production from migration tooling
Key benefits:
• Zero logical decoding overhead on production
• Better control over migration scope
• Improved fault isolation
• Flexible transformation using DMS
Trade-offs:
• Increased replication lag due to chaining
• More operational complexity
• WAL retention needs careful monitoring
• Logical decoding on standby requires newer PostgreSQL versions
This pattern is especially useful in regulated environments or where direct connectivity to AWS is restricted.
It is not the simplest design, but it is a powerful one when used in the right context.
Pre-Requisities on Both A and B
1. Ensure Port 5432 is added to Firewall whitelist on both hosts for ingress and also on the Security Group of the instance
sudo firewall-cmd --zone=public --permanent --add-port=5432/tcpsudo firewall-cmd --reload
2. listen_address in postgresql.conf is set to ‘*’
3. pg_hba.conf is set to allow all hosts
host all all 0.0.0.0/0 scram-sha-256
Update postgresql.conf:
wal_level = replicamax_wal_senders = 10wal_keep_size = 2048 #2GBhot_standby = on
Update pg_hba.conf:
host replication replicator <Server-B-IP>/32 scram-sha-256
Create replication user:
CREATE ROLE replicator WITH REPLICATION LOGIN PASSWORD 'password';
On EC2 instance (B) Install a fresh PostgreSQL engine or disable the previous Postgresql database for a fresh restore :
sudo systemctl stop postgresql-17mv /var/lib/pgsql/17/data/ /var/lib/pgsql/17/data_old
Take backup on EC2 instance (B) :
pg_basebackup -h <Server-A-IP> -D /var/lib/pgsql/17/data/ -U replicator -P -R -X stream
This:
standby.signalStart B as Standby
sudo systemctl start postgresql-17
Verify:
SELECT * FROM pg_stat_wal_receiver; 15436 | streaming | 0/7000000 | 1 | 0/7384628 | 0/7384628 | 1 | 2026-04-11 12:08:24.757316+00 | 2026-04-11 12:08:24.75985+00 | 0/7384628 | 2026-04-11 12:08:24.75581+00 | | 10.140.1.41 | 5432 | user=replicator password=******** channel_binding=prefer dbname=replication host=10.140.1.41 port=5432 fallback_application_name=walreceiver sslmode=prefer sslnegotiation=postgres sslcompression=0 sslcertmode=allow sslsni=1 ssl_min_protocol_version=TLSv1.2 gssencmode=prefer krbsrvname=postgres gssdelegation=0 target_session_attrs=any load_balance_hosts=disable
This is the critical step 👇
By default, a physical replica cannot act as a logical replication source unless configured properly.
Update on B:
wal_level = logicalmax_replication_slots = 10max_wal_senders = 10
⚠️ Important:
–> Requires restart
–> In PostgreSQL 14+, logical decoding on standby is supported
Create Logical Replication Slot (if using native)
SELECT * FROM pg_create_logical_replication_slot('dms_slot', 'pgoutput');
In Amazon Web Services:
dms_slot)pgoutputAurora PostgreSQL:
rds.logical_replication = 1
DMS will:
If A fails:
Use it when:
✔ Direct A → Aurora is not feasible
✔ You want zero impact on source DB
✔ You need data transformation/filtering
✔ You want controlled cutover with buffer layer
Avoid it when:
✖ Simplicity is priority
✖ Low-latency replication required
✖ PostgreSQL version < 14
A blue/green deployment works by creating a fully synchronized copy of your production database and running it as a separate staging environment.
In this article I will show how you can build a Blue-Green deployment for your OCI PostgreSQL for doing apps related testing.
Via Logical Replication for Major Version Upgrades or App Performance/Regression Testing
Most DBAs & DevOps people are already familiar with the Blue-Green deployment methodology when deploying a new version of a service. OCI PostgreSQL does not natively support Blue-Green deployment as of when this article was written. But it is quite easy to setup using a few OCI native components and logical replication with pglogical (or OCI Goldengate)
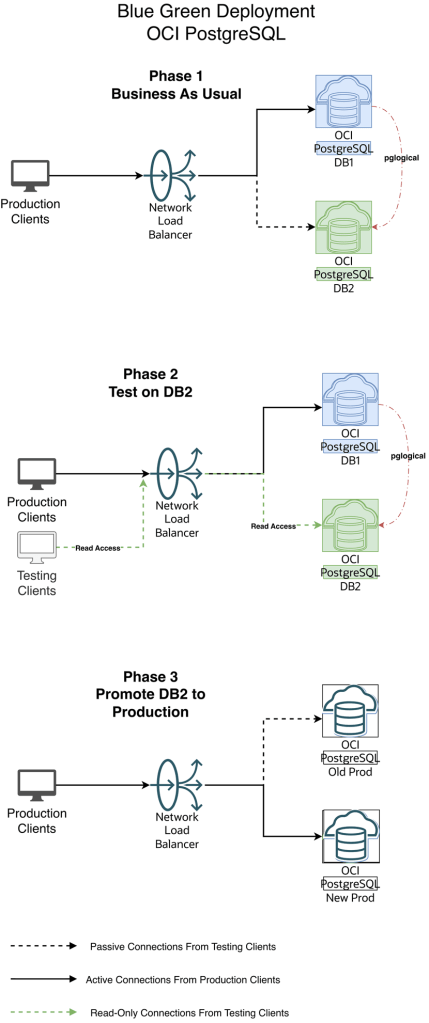
Diagram 1 — Blue-Green Workflow
1.Initial and One time setup:
a. Create an additional new version DB2 OCI PostgreSQL cluster
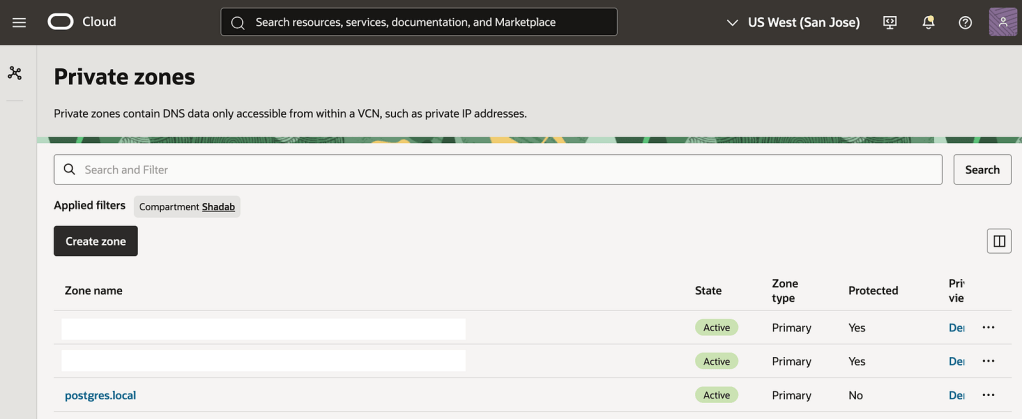
b. Create OCI DNS Private Zone for the Application for your VCN’s DNS resolver. This Zone will be used by the local applications to connect to OCI PostgreSQL via the OCI Load balancer. If you have an on-premise DNS and need to extend your on-premise DNS to resolve this private zone then refer this documentation : https://docs.oracle.com/en/solutions/oci-best-practices-networking/private-dns-oci-and-premises-or-third-party-cloud.html
c. Create an OCI Network load balancer for their applications to connect to. This LB will act as a proxy to the actual database system.
d. Have the load balancer backend point to the primary endpoint ip address of the database system(say DB1)
2. When we have new changes, do initial load for OCI Postgres between DB1 to DB2 using any of the logical data migration utilities like pg_dump, pg_restore
3. Create publication and subscription from DB1 to DB2 using pglogical (or OCI Goldengate)
4. Have the app tests hit DB2 endpoint to perform read queries, validate and certify the changes
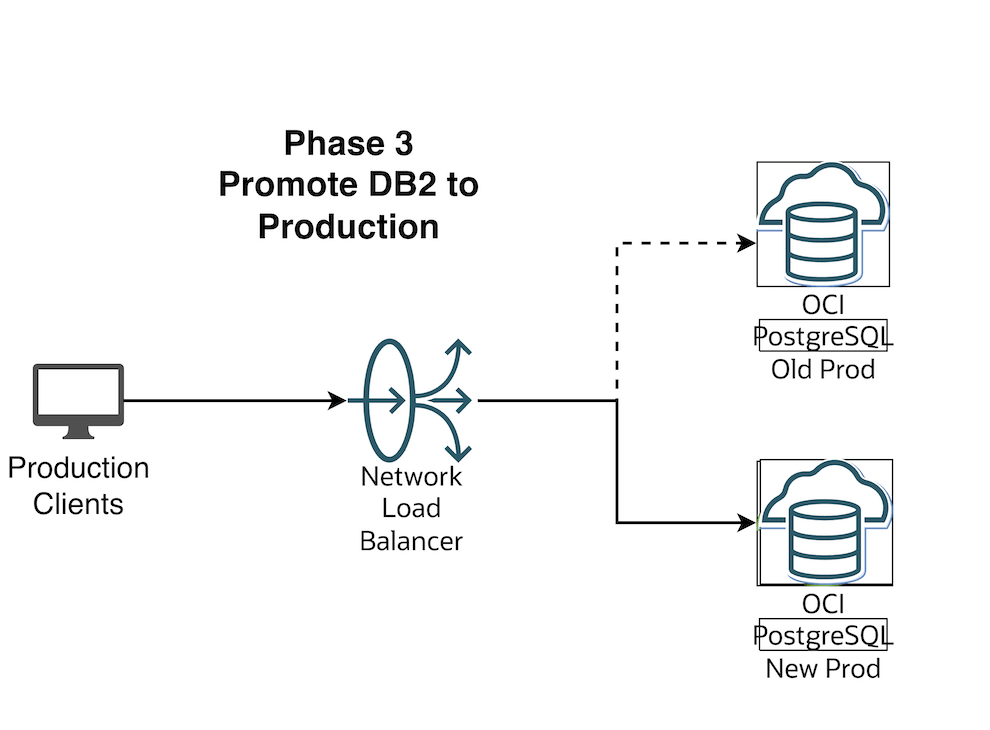
5. When DB2 appears ready for production consumption, orchestrate:
a. Pause any app activity and pause pglogical replication (optional) since pglogical is logical replication tool, the DB2 is always available in Read-Write mode. Just for App testing we are using read-only mode to avoid conflicts and complex scenario of reverse replication from DB2 to DB1
b. Update load balancer backend to the primary endpoint ip address of DB2
c. Stop the replication setup between DB1 and DB2 by stopping the publisher and subscribers
6. Production Client Apps are now connecting to the new Production environment (Green)

IP : 10.150.2.105
2. OCI PostgreSQL Database v16 which is the Green environment aka Staging

IP : 10.150.2.62
3. OCI Network Load Balancer with the 2 DB endpoints added as backend set fronted with a listener on tcp/5432

Listener

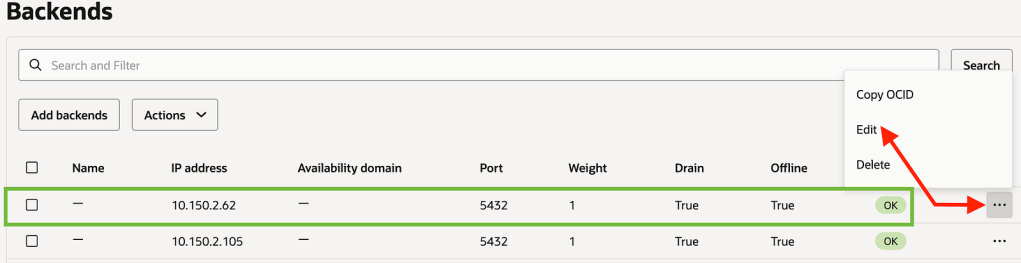
Backends

Make sure the Blue (Production) environment is active and the Green environment backend set is offline and drained.

4. Create an OCI DNS Private zone in your VCN’s DNS resolver
In my case i call my private zone postgres.local

nlb-app.postgres.local is the main FQDN all apps will use to connect the backend database
nlb-app-blue.postgres.local is the FQDN for Blue Database and this is not used by App connections
nlb-app-green.postgres.local is the FQDN for the Green Database and this is used by the App stack which will perform the Read-only queries for validating the application performance.
We will use the OCI Network Load Balancers backend set to make the blue backend IP offline and activate green IP, This incurs a small outage (in seconds depending on TTL of the DNS resolver) where the App moves from connecting to Blue Database to the Final Green Database which is promoted as production.
In this example we are demonstrating using a simple table : https://github.com/shadabshaukat/STAND/blob/main/postgres.sql
################# — Source Blue v15 — #################
Hostname : primary.umiokgnhd4hlpov7xncfwymgxv4pgq.postgresql.us-sanjose-1.oci.oraclecloud.com
Version : 15.12
— Run the following query to grant permissions on the source database to enable logical replication. —
CREATE EXTENSION pglogical;

show oci.admin_enabled_extensions ;
alter role postgres with replication;

grant EXECUTE on FUNCTION pg_catalog.pg_replication_origin_session_reset() to postgres ;

grant EXECUTE on FUNCTION pg_catalog.pg_replication_origin_session_setup to postgres ;

grant all on FUNCTION pg_catalog.pg_replication_origin_session_setup to postgres;
Note : postgres is the admin user created during the database setup process.
— Create the publisher node on the source database. —
SELECT pglogical.create_node(node_name := 'provider1',dsn :='host=primary.umiokgnhd4hlpov7xncfwymgxv4pgq.postgresql.us-sanjose-1.oci.oraclecloud.com port=5432 user=postgres password=RAbbithole1234## dbname=postgres');
node_name: Specify the name of the publisher to be created on the source database.

host: Enter the fully qualified domain name (FQDN) of the source database.

port_number: Provide the port on which the source database is running.

database_name: Specify the database where the publication will be created.
— Include all tables in the public schema to the default replication set. —
SELECT pglogical.replication_set_add_all_tables('default', ARRAY['public']);
replication_set_add_all_tables

 - - - - - - - - - - - - - - - -

 t

(1 row)
################# — Target Green v16 — #################
Hostname : primary.46mtfkxsj6337nqvx2de6gq3a57m4a.postgresql.us-sanjose-1.oci.oraclecloud.com
Version : 16.8
— Run the following query to grant permissions on the target database to enable logical replication. —
CREATE EXTENSION pglogical;

show oci.admin_enabled_extensions ;
alter role postgres with replication;

grant EXECUTE on FUNCTION pg_catalog.pg_replication_origin_session_reset() to postgres ;

grant EXECUTE on FUNCTION pg_catalog.pg_replication_origin_session_setup to postgres ;

grant all on FUNCTION pg_catalog.pg_replication_origin_session_setup to postgres;
Note : postgres is the admin user created during the database setup process.
— Create the subscriber node on target database. —
SELECT pglogical.create_node(node_name := 'subscriber1',dsn :='host=primary.46mtfkxsj6337nqvx2de6gq3a57m4a.postgresql.us-sanjose-1.oci.oraclecloud.com port=5432 user=postgres password=RAbbithole1234## dbname=postgres');
node_name: Define the name of the subscriber on the target database.

host: Enter the fully qualified domain name (FQDN) of the target database.

port_number: Enter the port on which the target database is running.

database_name: Provide the name of the database where the subscription will be created.
— Create the Schema-only on Target Database. This can also be done with pg_dump and pg_restore or psql —
CREATE TABLE orders (

 order_id SERIAL PRIMARY KEY,

 customer_id INTEGER,

 product_id INTEGER,

 product_description VARCHAR(500),

 order_delivery_address VARCHAR(500),

 order_date_taken DATE,

 order_misc_notes VARCHAR(500)

);
CREATE OR REPLACE FUNCTION add_random_orders(n INTEGER) RETURNS TEXT AS $$

DECLARE

 i INTEGER := 1;

 v_customer_id INTEGER;

 v_product_id INTEGER;

 v_product_description VARCHAR(500);

 v_order_delivery_address VARCHAR(500);

 v_order_date_taken DATE;

 v_order_misc_notes VARCHAR(500);

BEGIN

 WHILE i <= n LOOP

 v_customer_id := floor(random() * 100) + 1;

 v_product_id := floor(random() * 50) + 1;

 v_product_description := CONCAT('Product ', floor(random() * 10) + 1);

 v_order_delivery_address := CONCAT('Address ', floor(random() * 10) + 1);

 v_order_date_taken := CURRENT_DATE - (floor(random() * 30) || ' days')::INTERVAL;

 v_order_misc_notes := CONCAT('Note ', floor(random() * 10) + 1);

INSERT INTO orders (customer_id, product_id, product_description, order_delivery_address, order_date_taken, order_misc_notes)

 VALUES (v_customer_id, v_product_id, v_product_description, v_order_delivery_address, v_order_date_taken, v_order_misc_notes);

i := i + 1;

 END LOOP;

RETURN n || ' random orders added.';

EXCEPTION

 WHEN OTHERS THEN

 RAISE EXCEPTION 'Error: %', SQLERRM;

END;

$$ LANGUAGE plpgsql;
— Create the subscription on the subscriber node, which will initiate the background synchronization and replication processes. —
SELECT pglogical.create_subscription(subscription_name := 'subscription1',provider_dsn := 'host=primary.umiokgnhd4hlpov7xncfwymgxv4pgq.postgresql.us-sanjose-1.oci.oraclecloud.com port=5432 user=postgres password=RAbbithole1234## dbname=postgres sslmode=verify-full sslrootcert=/etc/opt/postgresql/ca-bundle.pem');
subscription_name: Provide the name of the subscription.

host: Provide the FQDN of the source database.

port_number: Provide the port on which the target database is running.

database_name: Provide the name of the source database.
Note: Be sure to use sslmode=verify-full and sslrootcert = /etc/opt/postgresql/ca-bundle.pem in subscription creation string to prevent any connection failures.
SELECT pglogical.wait_for_subscription_sync_complete('subscription1');
################# — Target Green v16 — #################
— Run the following statement to check the status of your subscription on your target database. —
select * from pglogical.show_subscription_status();


subscription_name | status | provider_node |

 provider_dsn |

 slot_name | replication_sets | forward_origins

 - - - - - - - - - -+ - - - - - - -+ - - - - - - - -+ - - - - - - - - - - - - - - - - - - - - - - - - - - - - - - - - - - - - - - - - - - -

 - - - - - - - - - - - - - - - - - - - - - - - - - - - - - - - - - - - - - - - - - - - - - - - - - - - - - - - - - - - - - - - - - - - -+

 - - - - - - - - - - - - - - - - - - - + - - - - - - - - - - - - - - - - - - - -+ - - - - - - - - -

 subscription1 | replicating | provider1 | host=primary.umiokgnhd4hlpov7xncfwymgxv4pgq.postgresql.us-sanjose-1.oci.oraclecloud.c

om port=5432 user=postgres password=RAbbithole1234## dbname=postgres sslmode=verify-full sslrootcert=/etc/opt/postgresql/ca-bundle.pem |

 pgl_postgres_provider1_subscription1 | {default,default_insert_only,ddl_sql} | {all}

(1 row)
################# — Source Blue v15 — #################
— Run the following statement to check the status of your replication on your source database. —
SELECT * FROM pg_stat_replication;


pid | usesysid | usename | application_name | client_addr | client_hostname | client_port | backend_start | backend

_xmin | state | sent_lsn | write_lsn | flush_lsn | replay_lsn | write_lag | flush_lag | replay_lag | sync_priority | sync_state |

 reply_time

 - - - -+ - - - - - + - - - - - + - - - - - - - - - + - - - - - - - + - - - - - - - - -+ - - - - - - -+ - - - - - - - - - - - - - - - -+ - - - -

 - - - + - - - - - -+ - - - - - -+ - - - - - -+ - - - - - -+ - - - - - - + - - - - - -+ - - - - - -+ - - - - - - + - - - - - - - -+ - - - - - - + -

 - - - - - - - - - - - - - - -

 18569 | 16387 | postgres | subscription1 | 10.150.2.196 | | 1247 | 2025–12–02 04:50:07.242335+00 |

 | streaming | 0/16BAB50 | 0/16BAB50 | 0/16BAB50 | 0/16BAB50 | | | | 0 | async | 2

025–12–02 05:09:09.626248+00

(1 row)
################# — Target Green v16 — #################
A. Stop or Start the Replication
You can disable the subscription using the following command on your target database.
select pglogical.alter_subscription_disable('subscription_name');
-- Target --

select pglogical.alter_subscription_disable('subscription1');
You can enable the subscription using the following command on your target database.
select pglogical.alter_subscription_enable('subscription_name');
-- Target --

select pglogical.alter_subscription_enable('subscription1');
Note: In subscription_name, enter the name of the subscription created at target.
B. Drop the Subscription
select pglogical.drop_subscription('subscription_name');
-- Target --

select pglogical.drop_subscription('subscription1');
Note: In subscription_name, enter the name of the subscription created at target.
C. Drop the Nodes
To drop the node from your Source or Target database, execute the following command :
select pglogical.drop_node('node_name');

Note: In node_name, enter the node name created in source/target database.
-- Source --

select pglogical.drop_node('provider1');
-- Target --

select pglogical.drop_node('subscriber1');
All the production clients are connected to Blue (Production) DB environment.
NLB has the Blue Environment Active in the Backend Set

We will use psql for the testing. So lets add alias to the App host to make the testing a bit simple.
alias pgblue='PGPASSWORD=YourPasswor@123# psql -h nlb-app-blue.postgres.local -U postgres -d postgres'
alias pggreen='PGPASSWORD=YourPasswor@123# psql -h nlb-app-green.postgres.local -U postgres -d postgres'
alias pgnlb='PGPASSWORD=YourPasswor@123# psql -h nlb-app.postgres.local -U postgres -d postgres'
If we do nslookup on the OCI Network Load Balancer FQDN we can see it resolve to the OCI Network Load Balancer’s IP
$ nslookup nlb-app.postgres.local


Server:  169.254.169.254

Address: 169.254.169.254#53


Non-authoritative answer:

Name: nlb-app.postgres.local

Address: 10.150.2.35
Your Apps are now connecting to the v15 Blue Database via this Endpoint

$ alias | grep pgnlb

alias pgnlb='PGPASSWORD=YourPasswor@123# psql -h nlb-app.postgres.local -U postgres -d postgres'
$ pgnlb


psql (17.7, server 15.12)

SSL connection (protocol: TLSv1.2, cipher: ECDHE-RSA-AES256-GCM-SHA384, compression: off, ALPN: none)

Type "help" for help.
## The Server we're connecting to is the v15.12 which is Blue

Your Testing Apps are now connecting to the v16 Green Database via this Endpoint
$ alias | grep pggreen

alias pggreen='PGPASSWORD=YourPasswor@123# psql -h nlb-app-green.postgres.local -U postgres -d postgres'
$ pggreen

psql (17.7, server 16.8)

SSL connection (protocol: TLSv1.2, cipher: ECDHE-RSA-AES256-GCM-SHA384, compression: off, ALPN: none)

Type "help" for help.
Flip the OCI Network Load Balancer Backend Set (Make sure TTL is as low as possible)
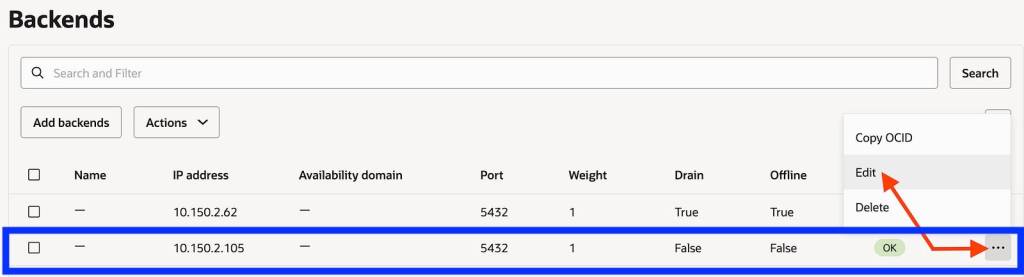
Make the current blue IP backend offline and drain it

Save the changes. In this brief moment there is no connectivity from App to DB and your business users should be notified that there will be a brief outage

If you run pgnlb it will hang as there is no backend IP to connect to
[opc@linux-bastion ~]$ pgnlb
Now let us make the Green environment as online from the backend set and Connect the Apps back.

Save Changes

Now connect with pgnlb
[opc@linux-bastion ~]$ pgnlb

psql (17.7, server 16.8)

SSL connection (protocol: TLSv1.2, cipher: ECDHE-RSA-AES256-GCM-SHA384, compression: off, ALPN: none)

Type "help" for help.
You can see that pgnlb is now connecting to the new upgraded v16 version which is the Green environment
We’ve successfully created a end-to-end Blue-Green Testing Methodolgy for OCI PostgreSQL
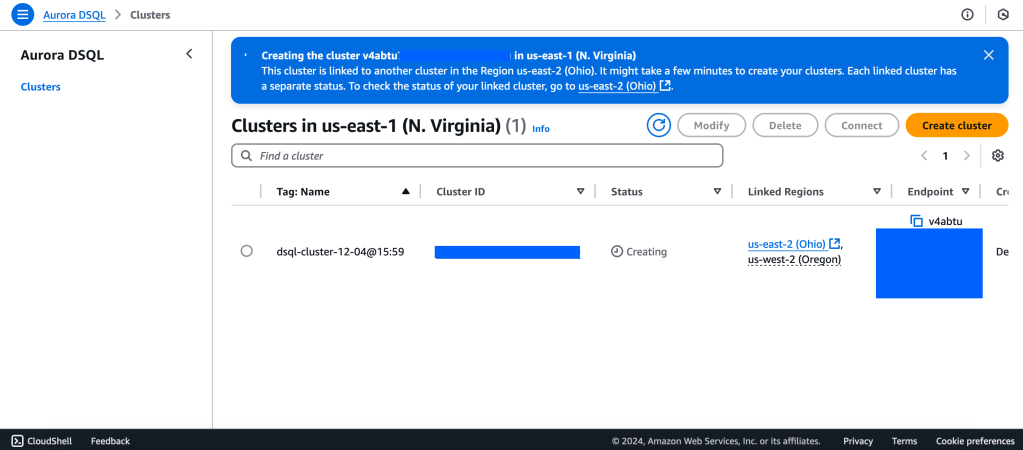
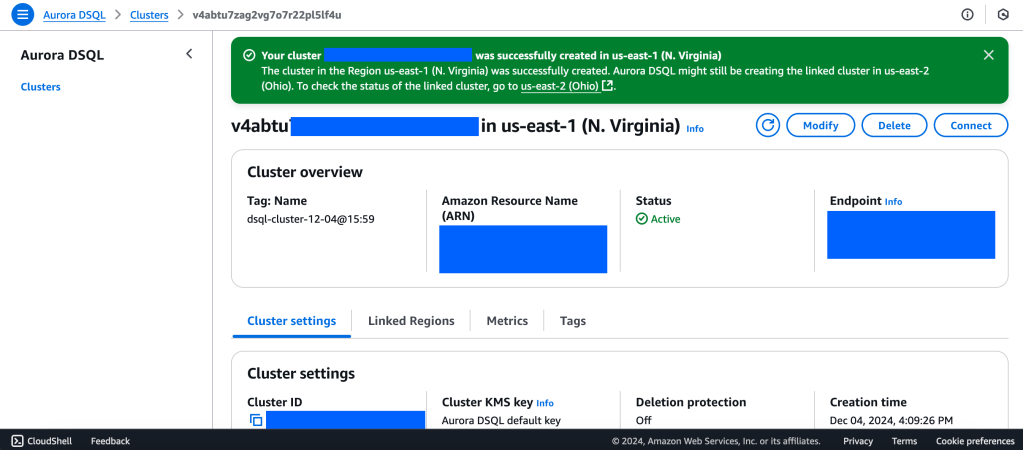
Amazon just launched the new Distributed SQ> Aurora Database today.
Aurora DSQL is already available as Public Preview in the US Regions. In this article I want to give you the first preview on creating a cluster and connecting to it with psql client.
Go to this link to get started : https://console.aws.amazon.com/dsql/
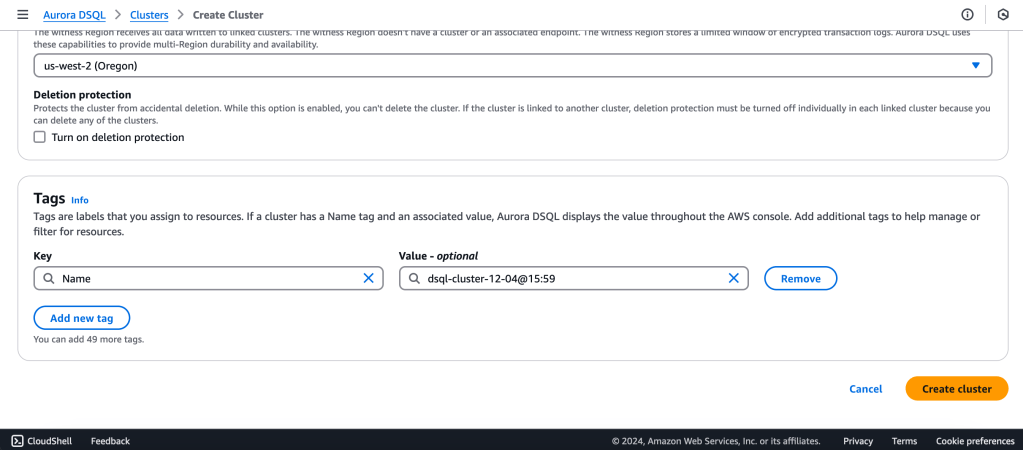
We will create a Multi-Region with a Linked region and a Witness region.
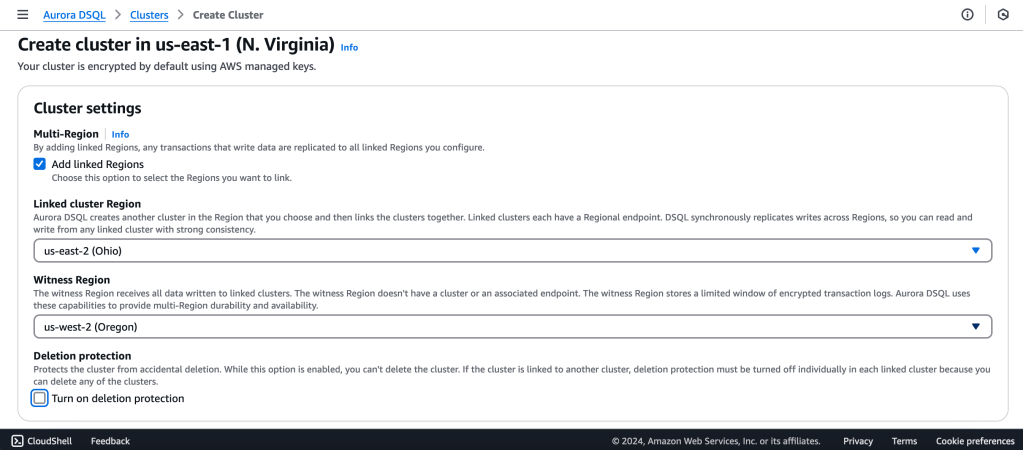
us-east-1 (N Virginia) -> Writer
us-east-2 (Ohio) -> Writer
us-west-2 (Oregon) -> Quorum
https://docs.aws.amazon.com/aurora-dsql/latest/userguide/authentication-token-cli.html
aws dsql generate-db-connect-admin-auth-token \
–expires-in 3600 \
–region us-east-1 \
–hostname <dsql-cluster-endpoint>
The full output will be the password, like below :
v4********4u.dsql.us-east-1.on.aws/?Action=DbConnectAdmin&X-Amz-Algorithm=AWS4-HMAC-SHA256&X-Amz-Credential=AK*****04%2Fus-east-1%2Fdsql%2Faws4_request&X-Amz-Date=202**X-Amz-Expires=3600&X-Amz-SignedHeaders=host&X-Amz-Signature=41e15*****ddfc49
PGSSLMODE=require \
psql –dbname postgres \
–username admin \
–host v4*******u.dsql.us-east-1.on.aws
Password for user admin: <paste-full-string-of-auth-token-output>
psql (17.2, server 16.5)
SSL connection (protocol: TLSv1.3, cipher: TLS_AES_128_GCM_SHA256, compression: off, ALPN: none)
Type “help” for help.
postgres=>
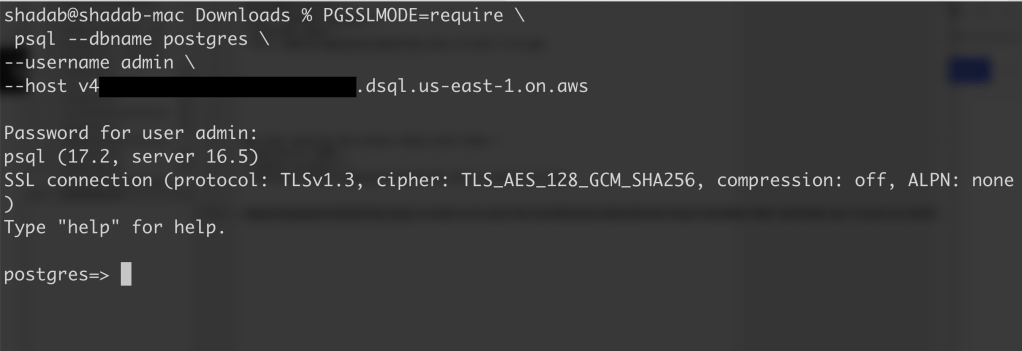
We can connect with a Standard PSQL client!!
CREATE SCHEMA app;
CREATE TABLE app.orders (
order_id UUID PRIMARY KEY DEFAULT gen_random_uuid(),
customer_id INTEGER,
product_id INTEGER,
product_description VARCHAR(500),
order_delivery_address VARCHAR(500),
order_date_taken DATE,
order_misc_notes VARCHAR(500)
);
Sample CSV File to Load Data to Orders Table :
\COPY app.orders (order_id,customer_id,product_id,product_description,order_delivery_address,order_date_taken,order_misc_notes) FROM ‘/Users/shadab/Downloads/sample_orders.csv’ DELIMITER ‘,’ CSV HEADER;
/* Try to wrap the command in a single-line */
[a] Query to Find the Top 5 Customers by Total Orders Within the Last 6 Months
WITH recent_orders AS (
SELECT
customer_id,
product_id,
COUNT(*) AS order_count
FROM
app.orders
WHERE
order_date_taken >= CURRENT_DATE – INTERVAL ‘6 months’
GROUP BY
customer_id, product_id
)
SELECT
customer_id,
SUM(order_count) AS total_orders,
STRING_AGG(DISTINCT product_id::TEXT, ‘, ‘) AS ordered_products
FROM
recent_orders
GROUP BY
customer_id
ORDER BY
total_orders DESC
LIMIT 5;
[b] Query to Find the Most Common Delivery Address Patterns
SELECT
LEFT(order_delivery_address, POSITION(‘,’ IN order_delivery_address) – 1) AS address_prefix,
COUNT(*) AS order_count
FROM
app.orders
GROUP BY
address_prefix
ORDER BY
order_count DESC
LIMIT 10;
[c] Query to Calculate Monthly Order Trends by Product
SELECT
TO_CHAR(order_date_taken, ‘YYYY-MM’) AS order_month,
product_id,
COUNT(*) AS total_orders,
AVG(LENGTH(order_misc_notes)) AS avg_note_length — Example of additional insight
FROM
app.orders
GROUP BY
order_month, product_id
ORDER BY
order_month DESC, total_orders DESC;
You can check latency from AWS Cloud Shell using traceroute to your Aurora DSQL endpoints from different regions
us-east-1 (N Virginia)
$ traceroute v*****u.dsql.us-east-1.on.aws
traceroute to v****u.dsql.us-east-1.on.aws (44.223.172.242), 30 hops max, 60 byte packets
1 * * 216.182.237.241 (216.182.237.241) 1.566 ms
ap-southeast-2 (Sydney)
$ traceroute v*****u.dsql.us-east-1.on.aws
traceroute to v********u.dsql.us-east-1.on.aws (44.223.172.242), 30 hops max, 60 byte packets
1 244.5.0.119 (244.5.0.119) 1.224 ms * 244.5.0.115 (244.5.0.115) 5.922 ms
2 100.65.22.0 (100.65.22.0) 4.048 ms 100.65.23.112 (100.65.23.112) 5.203 ms 100.65.22.224 (100.65.22.224) 3.309 ms
3 100.66.9.110 (100.66.9.110) 25.430 ms 100.66.9.176 (100.66.9.176) 7.950 ms 100.66.9.178 (100.66.9.178) 3.966 ms
4 100.66.10.32 (100.66.10.32) 0.842 ms 100.66.11.36 (100.66.11.36) 2.745 ms 100.66.11.96 (100.66.11.96) 3.638 ms
5 240.1.192.3 (240.1.192.3) 0.263 ms 240.1.192.1 (240.1.192.1) 0.278 ms 240.1.192.3 (240.1.192.3) 0.244 ms
6 240.0.236.32 (240.0.236.32) 197.174 ms 240.0.184.33 (240.0.184.33) 197.206 ms 240.0.236.13 (240.0.236.13) 199.076 ms
7 242.3.84.161 (242.3.84.161) 200.891 ms 242.2.212.161 (242.2.212.161) 202.113 ms 242.2.212.33 (242.2.212.33) 197.571 ms
8 240.0.32.47 (240.0.32.47) 196.768 ms 240.0.52.96 (240.0.52.96) 196.935 ms 240.3.16.65 (240.3.16.65) 197.235 ms
9 242.7.128.1 (242.7.128.1) 234.734 ms 242.2.168.185 (242.2.168.185) 203.477 ms 242.0.208.5 (242.0.208.5) 204.263 ms
10 * 100.66.10.209 (100.66.10.209) 292.168 ms *
References:
[1] Aurora DSQL : https://aws.amazon.com/rds/aurora/dsql/features/
[2] Aurora DSQL User Guide : https://docs.aws.amazon.com/aurora-dsql/latest/userguide/getting-started.html#getting-started-create-cluster
[3] Use the AWS CLI to generate a token in Aurora DSQL : https://docs.aws.amazon.com/aurora-dsql/latest/userguide/authentication-token-cli.html
[4] DSQL Vignette: Aurora DSQL, and A Personal Story : https://brooker.co.za/blog/2024/12/03/aurora-dsql.html
——————————————————————————————–
sudo yum remove awscli

curl "https://awscli.amazonaws.com/awscli-exe-linux-x86_64.zip" -o "awscliv2.zip"

unzip awscliv2.zip

sudo ./aws/install

/usr/local/bin/aws --versionvim ~/.bash_profile
aws --version
aws configure
Create DynamoDB Table

aws dynamodb create-table \
--table-name CustomerRecords \
--attribute-definitions \
AttributeName=CustomerID,AttributeType=S \
AttributeName=RecordDate,AttributeType=S \
--key-schema \
AttributeName=CustomerID,KeyType=HASH \
AttributeName=RecordDate,KeyType=RANGE \
--billing-mode PAY_PER_REQUEST

# Delete DynamoDB Table
aws dynamodb delete-table --table-name CustomerRecords
# Enable Point-in-Time-Recoveryaws dynamodb update-continuous-backups --table-name CustomerRecords --point-in-time-recovery-specification PointInTimeRecoveryEnabled=Trueimport boto3
import faker
import sys
# Generate fake data
def generate_data(size):
fake = faker.Faker()
records = []
for _ in range(size):
record = {
'CustomerID': fake.uuid4(),
'RecordDate': fake.date(),
'Name': fake.name(),
'Age': fake.random_int(min=0, max=100),
'Gender': fake.random_element(elements=('Male', 'Female', 'Other')),
'Address': fake.sentence(),
'Description': fake.sentence(),
'OrderID': fake.uuid4()
}
records.append(record)
return records
def write_data_in_chunks(table_name, data, chunk_size):
dynamodb = boto3.resource('dynamodb')
table = dynamodb.Table(table_name)
for i in range(0, len(data), chunk_size):
with table.batch_writer() as batch:
for record in data[i:i+chunk_size]:
batch.put_item(Item=record)
print(f"Successfully wrote {len(data)} records to {table_name} in chunks of {chunk_size}.")
if __name__ == "__main__":
table_name = 'CustomerRecords'
chunk_size = int(sys.argv[1]) if len(sys.argv) > 1 else 1000
data = generate_data(chunk_size)
write_data_in_chunks(table_name, data, chunk_size)$ python3 load_to_dynamodb.py 1000date +%s
1710374718aws dynamodb export-table-to-point-in-time \
--table-arn arn:aws:dynamodb:ap-southeast-2:11111111:table/CustomerRecords \
--s3-bucket customerrecords-dynamodb \
--s3-prefix exports/ \
--s3-sse-algorithm AES256
--export-time 1710374718aws dynamodb export-table-to-point-in-time \
--table-arn arn:aws:dynamodb:ap-southeast-2:11111111:table/CustomerRecords \
--s3-bucket customerrecords-dynamodb \
--s3-prefix exports_incremental/ \
--incremental-export-specification ExportFromTime=1710374718,ExportToTime=1710375760,ExportViewType=NEW_IMAGE \
--export-type INCREMENTAL_EXPORTImportant Note :

Article first appeared here
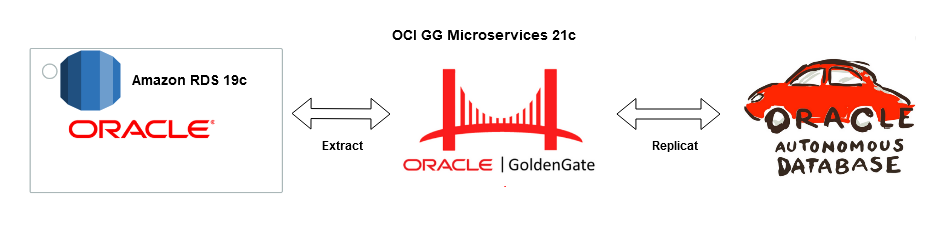
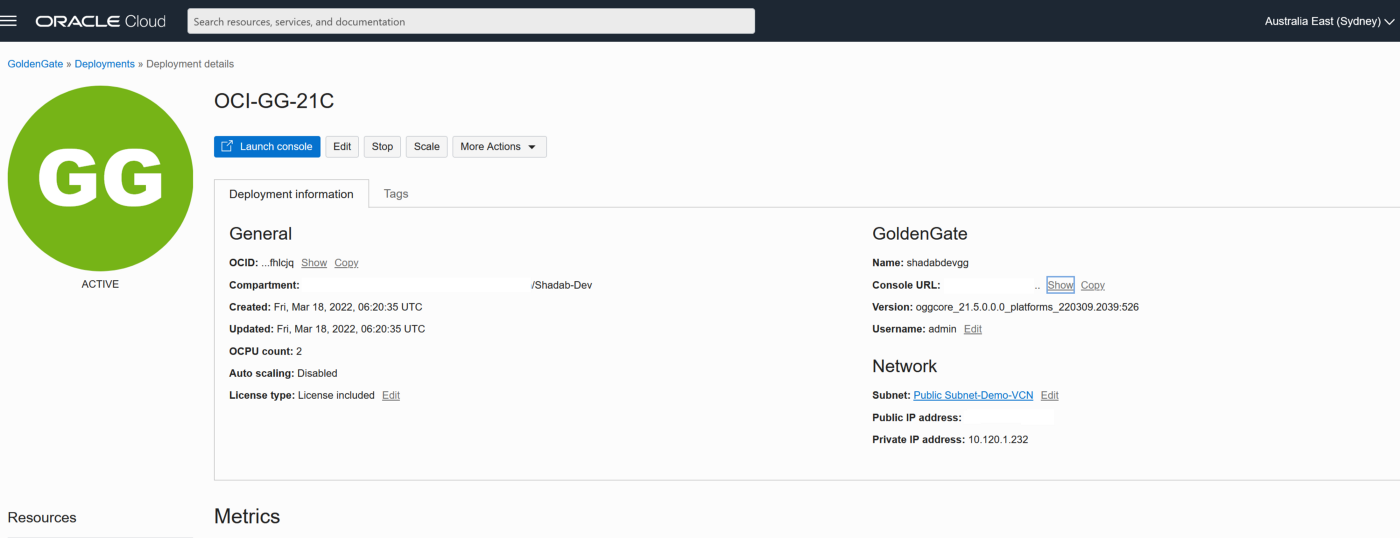
Goldengate Microservices 21c is the latest version of the microservices architecture which makes creating data mesh and data fabric across different public clouds as easy as a few clicks. Goldengate is available on OCI as a fully managed service with auto-scaling. It does not.require installation of Goldengate software at either the source or Target db instances. Goldengate uses a capture and apply mechanism for replication using trail files. Both the extract (capture) and replicat (apply) processes run on the Goldengate replication instance which acts as a hub.
Let us go ahead and create a data pipeline for replicating Data in real-time using Oracle Cloud Infrastructure (OCI) Goldengate 21c from Amazon RDS Oracle Instance to an Oracle Autonomous database in OCI. Below are some of the common use cases for this solution :
Source : Amazon RDS Oracle 19c EE
Target : OCI Autonomous Transaction Processing 19c
Replication Hub : OCI Goldengate 21c Microservices
Network : Site-to Site IPsec VPN or Fastconnect (Direct Connect on AWS)

The solution is broadly divided into four phases :
Phase 1 — AWS Setup : RDS Source and Enable Goldengate Capture
The first part of the setup requires us to provision a VPC, Subnet Group and Oracle 19c RDS Instance on AWS. Please ensure all the requistie Network constructs like security groups are in place for connectivity from OCI Goldengate to RDS. In a production scenario it would be betetr to have the RDS instance without a public endpoint and have a Fastconnect setup from AWS to OCI


2. Create RDS Oracle Instance 19.1 EE with super user as ‘admin’
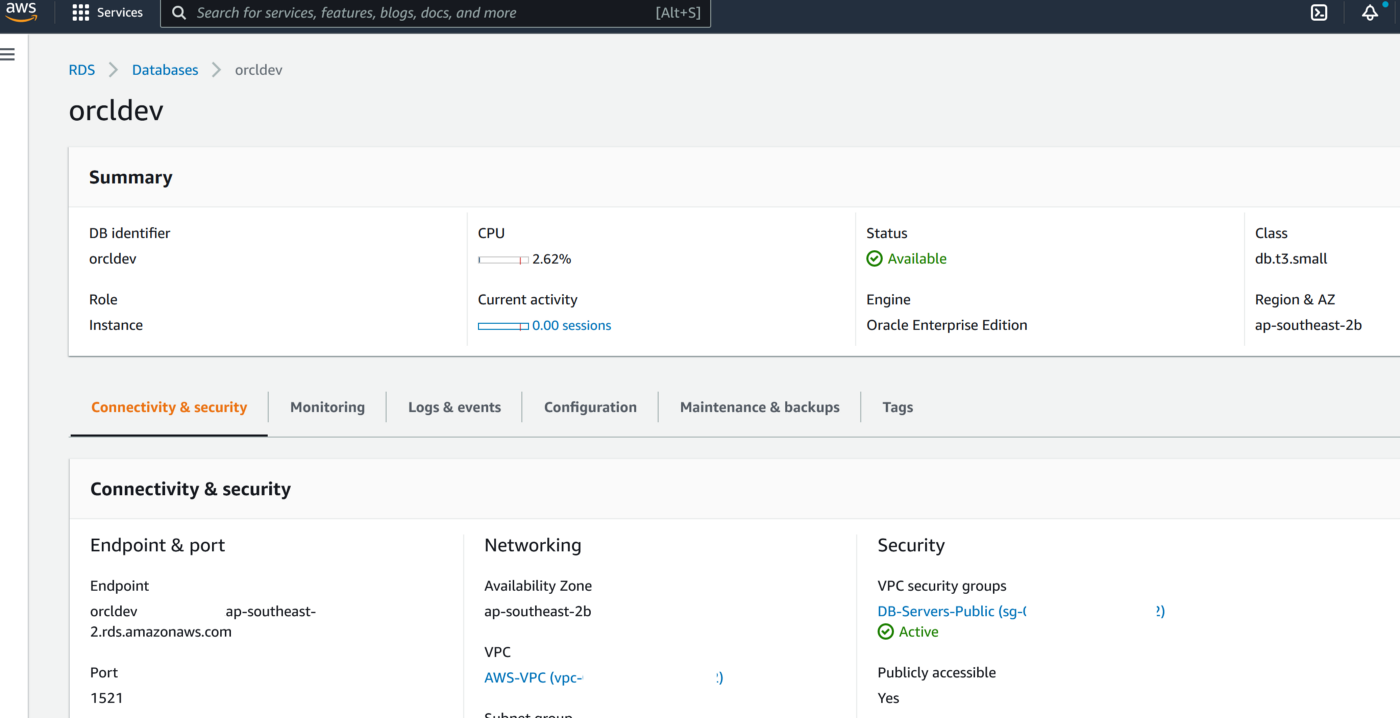
3. Create a new DB Parameter Group for 19.1 EE with parameter ENABLE_GOLDENGATE_REPLICATION set to TRUE
4. Change the parameter group of the RDS instance and reboot the RDS Oracle instance once the parameter group has been applied. Double-check to confirm the parameter ENABLE_GOLDENGATE_REPLICATION is set to True and the correct parameter group is applied to the RDS isntance
5. Set the log retention period on the source DB with ‘admin’ user
exec rdsadmin.rdsadmin_util.set_configuration('archivelog retention hours',24);commit;
6. Create a new user account to be used for Goldengateon the RDS instance with ‘admin’ user
CREATE TABLESPACE administrator;
CREATE USER oggadm1 IDENTIFIED BY “*********” DEFAULT TABLESPACE ADMINISTRATOR TEMPORARY TABLESPACE TEMP;
commit;
7. Grant account privileges on the source RDS instance with ‘admin’ user
GRANT CREATE SESSION, ALTER SESSION TO oggadm1;
GRANT RESOURCE TO oggadm1;
GRANT SELECT ANY DICTIONARY TO oggadm1;
GRANT FLASHBACK ANY TABLE TO oggadm1;
GRANT SELECT ANY TABLE TO oggadm1;
GRANT SELECT_CATALOG_ROLE TO admin WITH ADMIN OPTION;
exec rdsadmin.rdsadmin_util.grant_sys_object (‘DBA_CLUSTERS’, ‘OGGADM1’);
exec rdsadmin.rdsadmin_util.grant_sys_object (‘DBA_CLUSTERS’, ‘ADMIN’);
GRANT EXECUTE ON DBMS_FLASHBACK TO oggadm1;
GRANT SELECT ON SYS.V_$DATABASE TO oggadm1;
GRANT ALTER ANY TABLE TO oggadm1;
grant unlimited tablespace TO oggadm1;
grant EXECUTE_CATALOG_ROLE to admin WITH ADMIN OPTION;
commit;
8. Finally, grant the privileges needed by a user account to be a GoldenGate administrator. The package that you use to perform the grant, dbms_goldengate_auth or rdsadmin_dbms_goldengate_auth, depends on the Oracle DB engine version.
— With admin user on RDS Oracle instance for Oracle Database version lower than 12.2 —
exec dbms_goldengate_auth.grant_admin_privilege (grantee=>’OGGADM1′,privilege_type=>’capture’,grant_select_privileges=>true, do_grants=>TRUE);
exec dbms_goldengate_auth.grant_admin_privilege(‘OGGADM1′,container=>’all’);
exec dbms_goldengate_auth.grant_admin_privilege(‘OGGADM1’);
commit;
— For Oracle DB versions that are later than or equal to Oracle Database 12c Release 2 (12.2), which requires patch level 12.2.0.1.ru-2019–04.rur-2019–04.r1 or later, run the following PL/SQL program.
exec rdsadmin.rdsadmin_dbms_goldengate_auth.grant_admin_privilege (grantee=>’OGGADM1′, privilege_type=>’capture’,grant_select_privileges=>true, do_grants=>TRUE);
commit;
To revoke privileges, use the procedure revoke_admin_privilege in the same package.
9. TNS entry for AWS RDS Instance
OGGTARGET=(DESCRIPTION=(ENABLE=BROKEN)(ADDRESS_LIST=(ADDRESS=(PROTOCOL=TCP)(HOST=orcl.*****.ap-southeast-2.rds.amazonaws.com)(PORT=1521)))(CONNECT_DATA=(SID=ORCL)))– To be added to Registered Database in OCI –(DESCRIPTION=(ENABLE=BROKEN)(ADDRESS_LIST=(ADDRESS=(PROTOCOL=TCP)(HOST=orcl.****.ap-southeast-2.rds.amazonaws.com)(PORT=1521)))(CONNECT_DATA=(SID=ORCL)))
Alias (to be used later in OCI GG configuration) : ORCLAWS
10. Create Test Table in RDS Oracle Instance
CREATE TABLE oggadm1.test (id number,name varchar2(100));
insert into oggadm1.test values (1,’Shadab’);
insert into oggadm1.test values (2,’Mohammad’);
commit;
11. Enable supplemental logging on with Admin user
— Enable Force logging —
EXEC rdsadmin.rdsadmin_util.force_logging(p_enable => true);
— Enable Supplemental logging —
begin rdsadmin.rdsadmin_util.alter_supplemental_logging(p_action => ‘ADD’);
end;
— Enable Force logging —
EXEC rdsadmin.rdsadmin_util.force_logging(p_enable => true);
— Enable Supplemental logging —
begin rdsadmin.rdsadmin_util.alter_supplemental_logging(p_action => ‘ADD’);
end;
— Enable Force logging —
EXEC rdsadmin.rdsadmin_util.force_logging(p_enable => true);
— Enable Supplemental logging —
begin rdsadmin.rdsadmin_util.alter_supplemental_logging(p_action => ‘ADD’);
end;
/
Phase 2 — OCI Setup : Autonomous Database
We will provision the VCN, Autonomous Database on OCI and enable the goldengate replication user
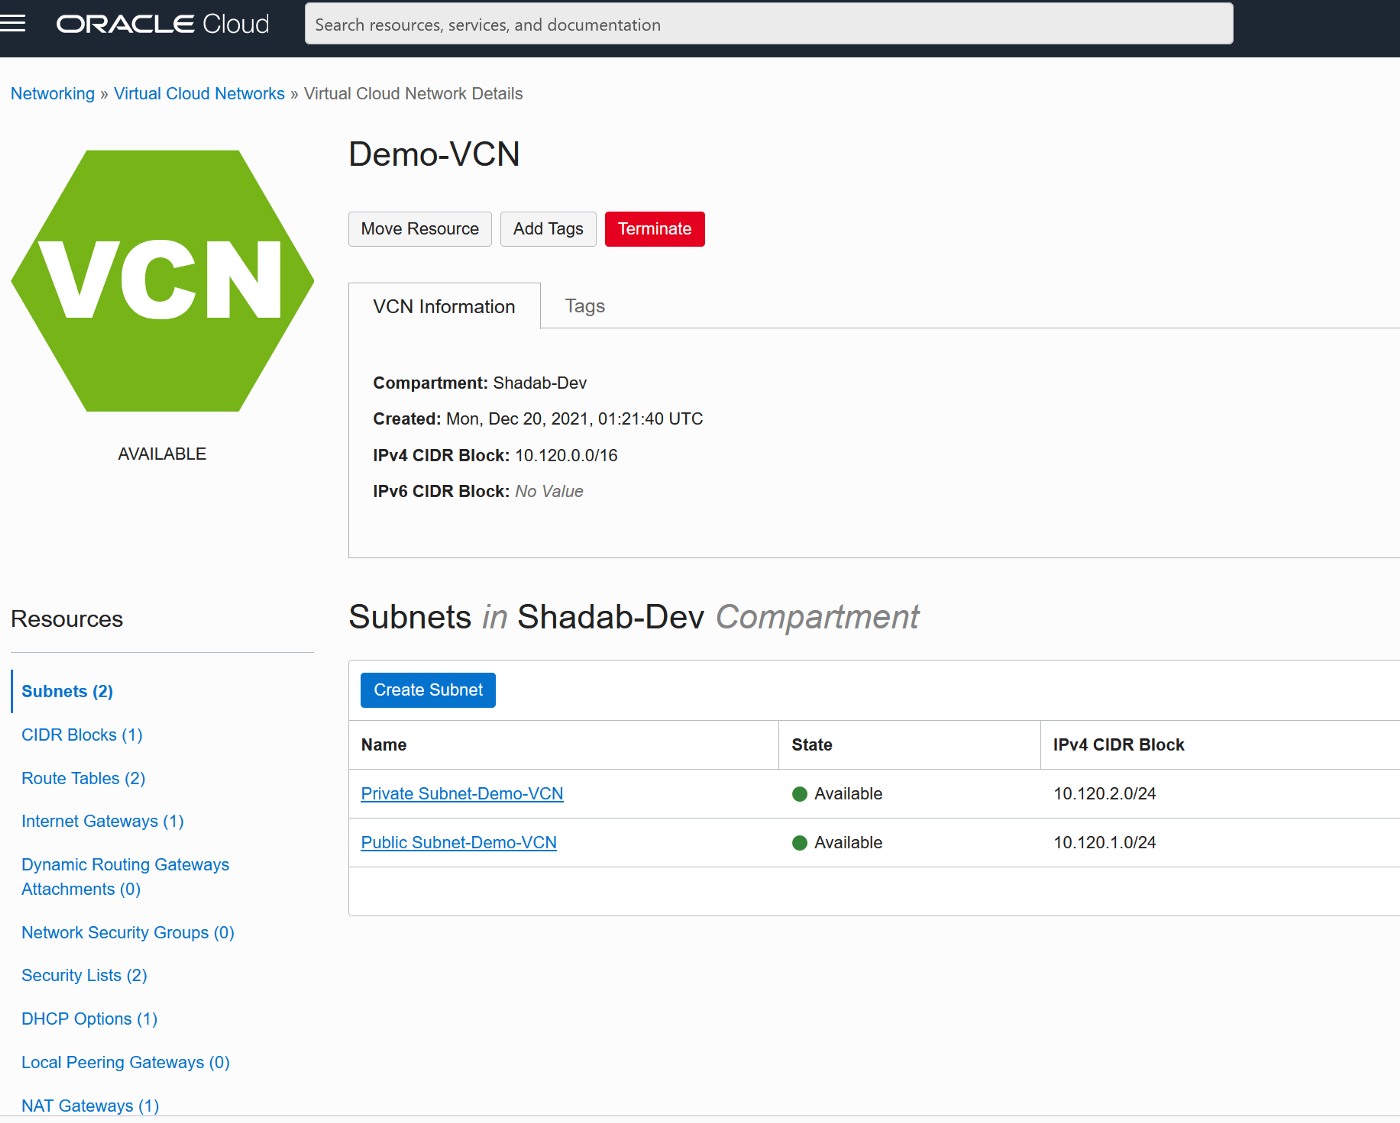
2. Create Autonomous Transaction Processing Database with Network Options and mTLS not required
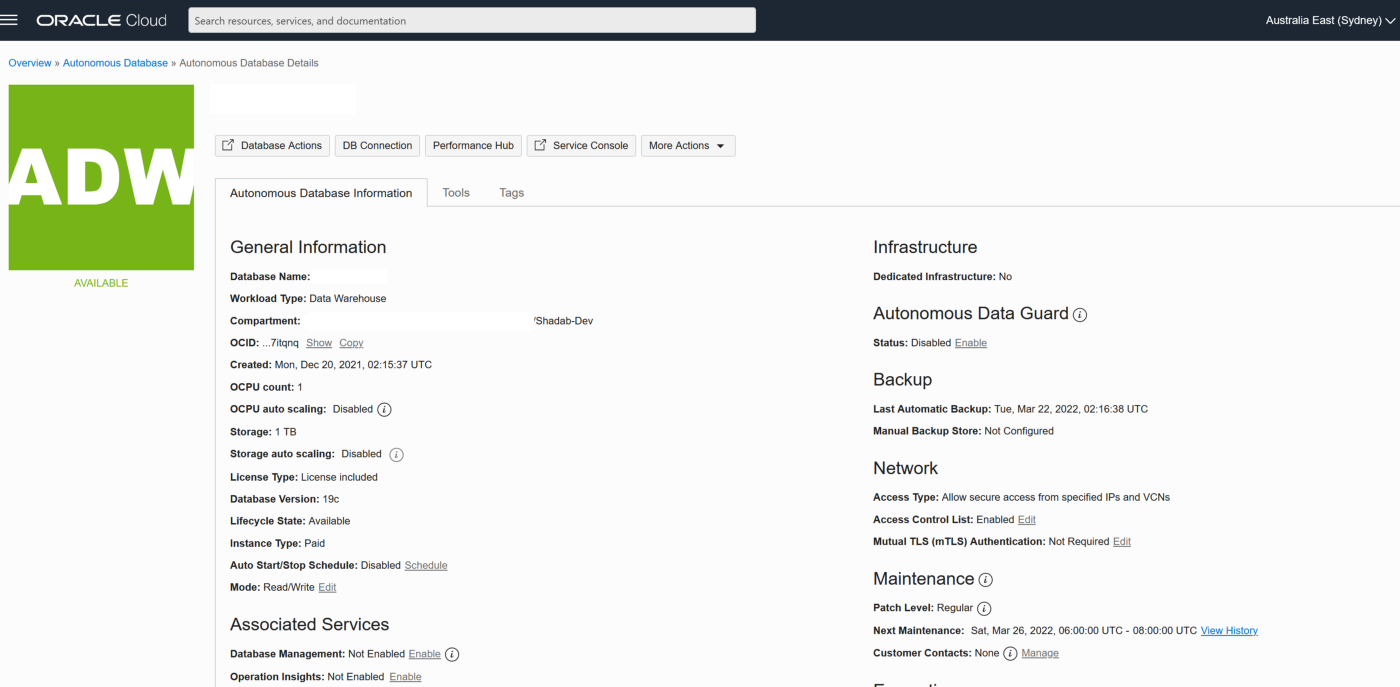
3. Unlock ggadmin user in the ATP
alter user ggadmin identified by ****** account unlock;
4. Create Table ‘test’ in admin schema and do initial load (Normally this has to be done using data pump but it is beyond the scope of this article)
CREATE TABLE test (id number,name varchar2(100));
insert into test values (1,’Shadab’);
insert into test values (2,’Mohammad’);
commit;
select * from test;
Phase 3 — OCI Setup : Goldengate
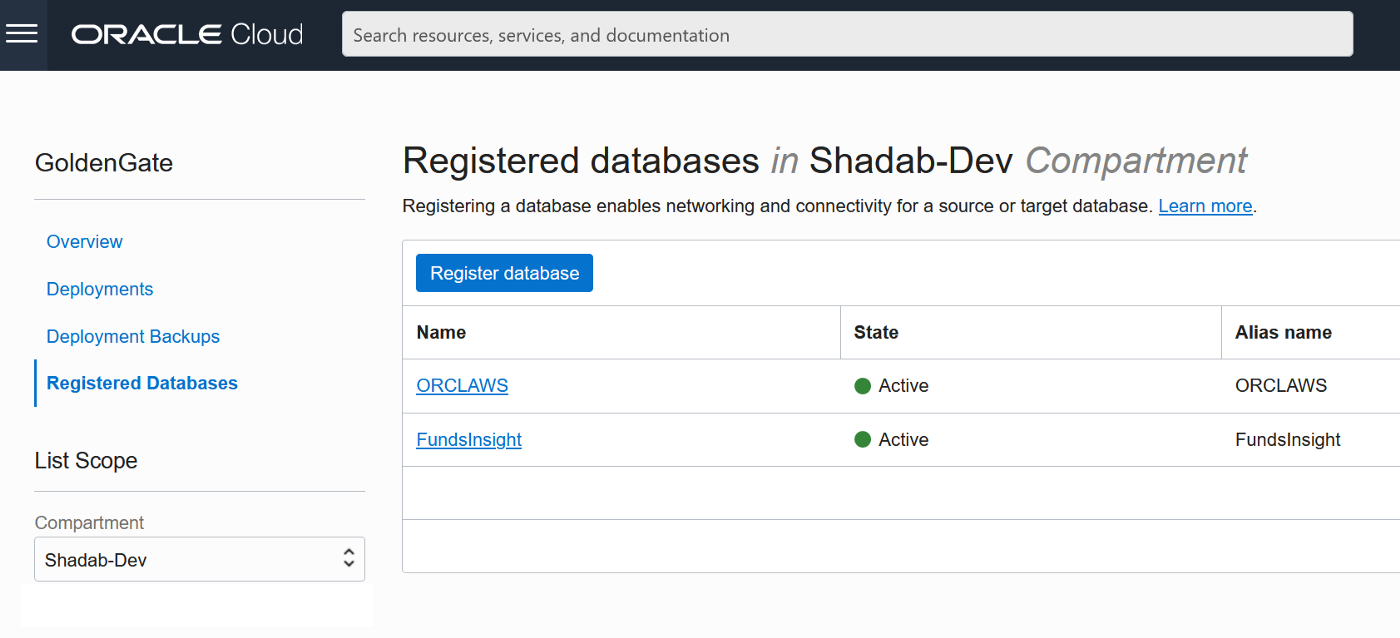
2. Go to Oracle Database > Goldengate > Registered Databases
a. Add the ATP database created above with the ggadmin user
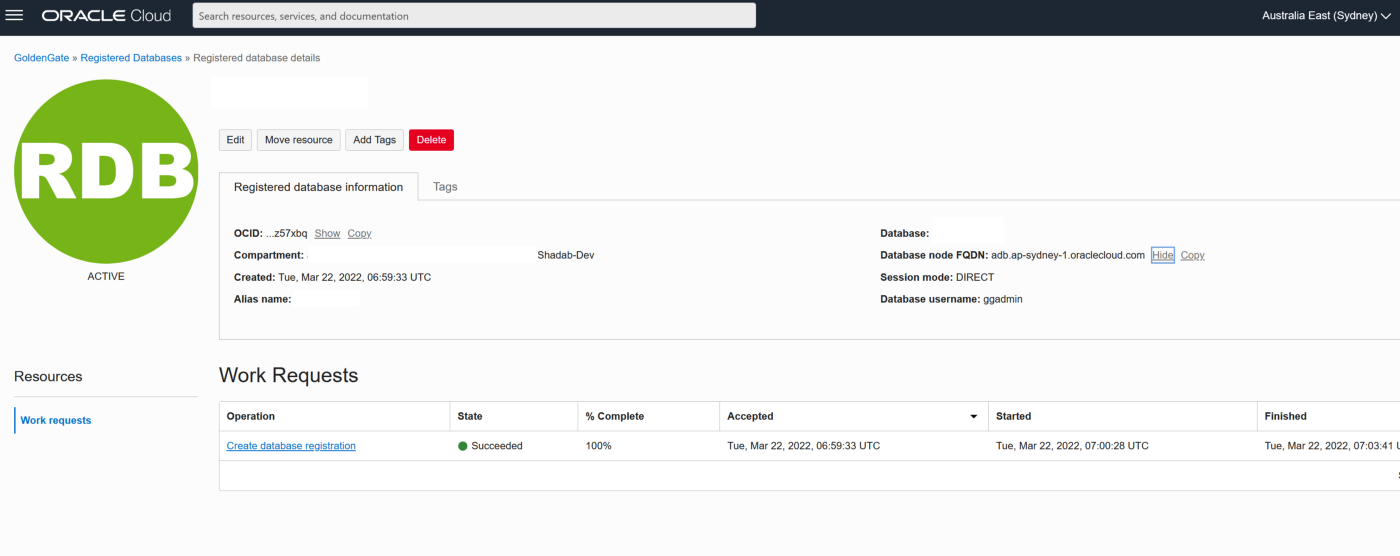
b. Add the RDS instance database using oggadm1 user
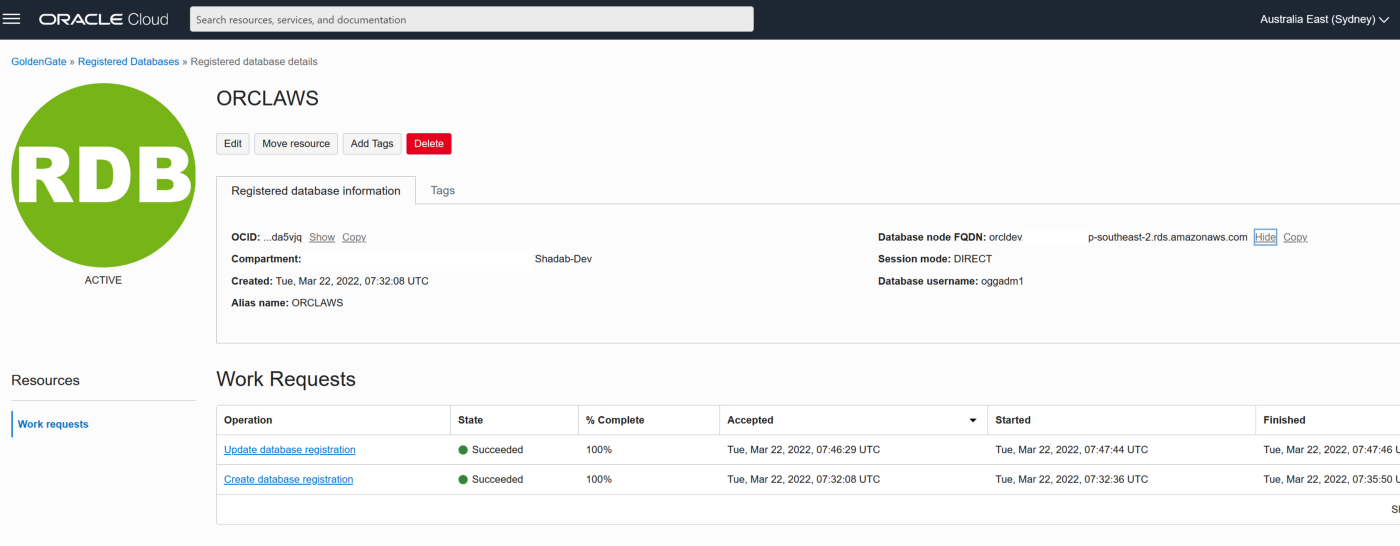
3. Test the connectivity to both databases , it should in console as Active
4. Go the launch URL for the Goldengate deployment username and password as per step 1.
eg : https://e*******q.deployment.goldengate.ap-sydney-1.oci.oraclecloud.com/

1. Create an Integrated Extract from Administration Service, click on the plus symbol next to the extract section
Go to Main Page > Configuration > Login to AWS RDS instance
a. Create Checkpoint table oggadm1.ckpt
b. Add Tran Data for Schema oggadm1
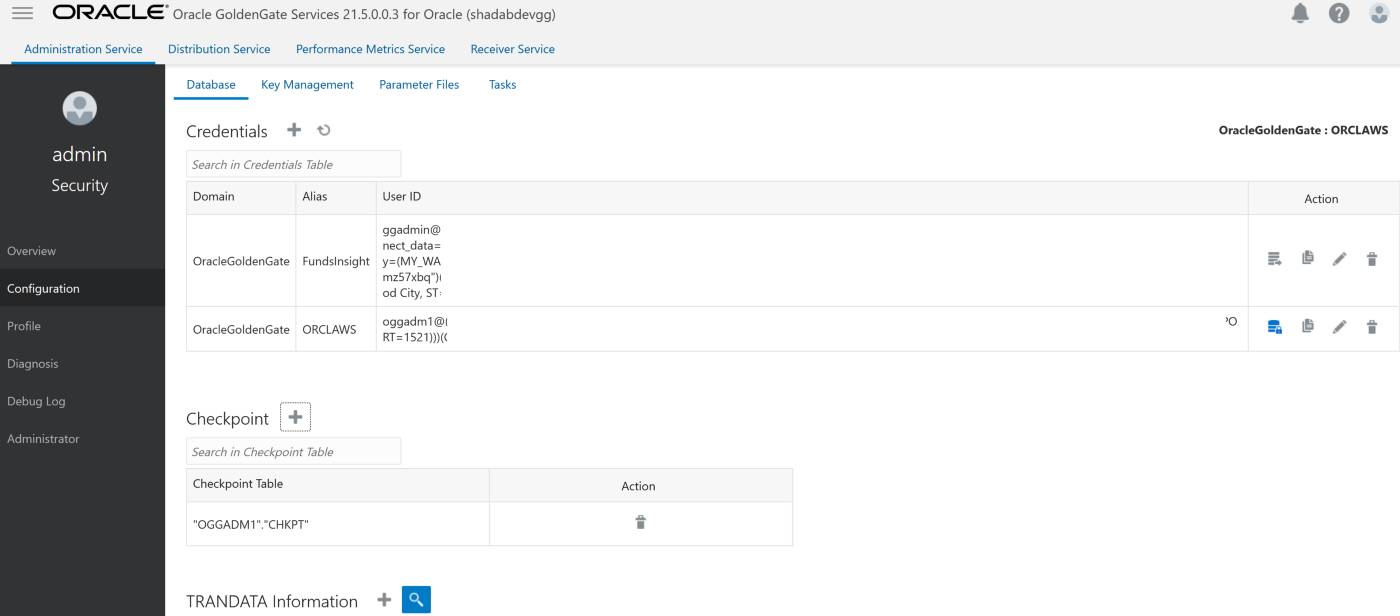
EXTRACT AWSEXT
USERIDALIAS ORCLAWS DOMAIN OracleGoldenGate
EXTTRAIL AW
TABLE OGGADM1.*;
2. Create Non-integrated replicat for ADB on trail file ‘aw’. click on the plus symbol next to the Replicat section
Go to Main Page > Configuration > Login to ATP instance
a. Create Checkpoint table admin.ckpt
b. Add Tran Data for Schema admin
c. Add heartbeat table

REPLICAT adbrep
USERIDALIAS FundsInsight DOMAIN OracleGoldenGate
MAP OGGADM1.TEST, TARGET ADMIN.TEST;
The status should be green on the OCI Goldengate Administration Dashboard

3. Insert transaction at RDS source
insert into oggadm1.test values(3,'Utuhengal');commit;
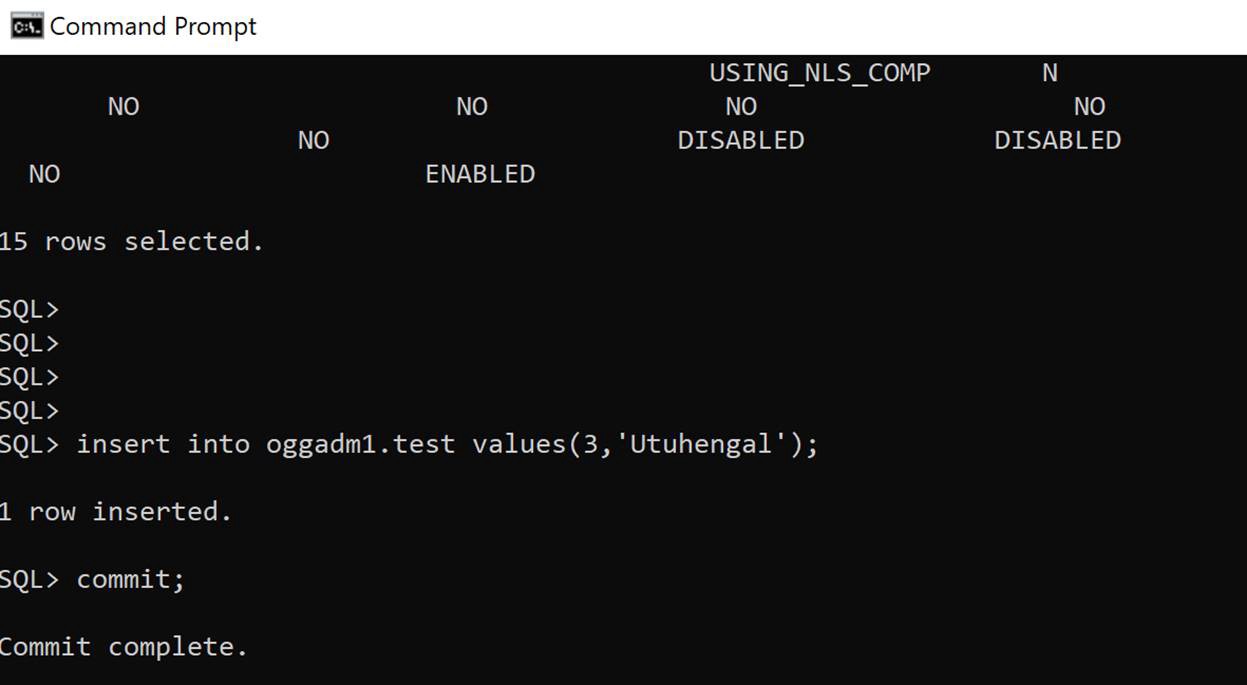
4. Check at ADB Target
select * from test;
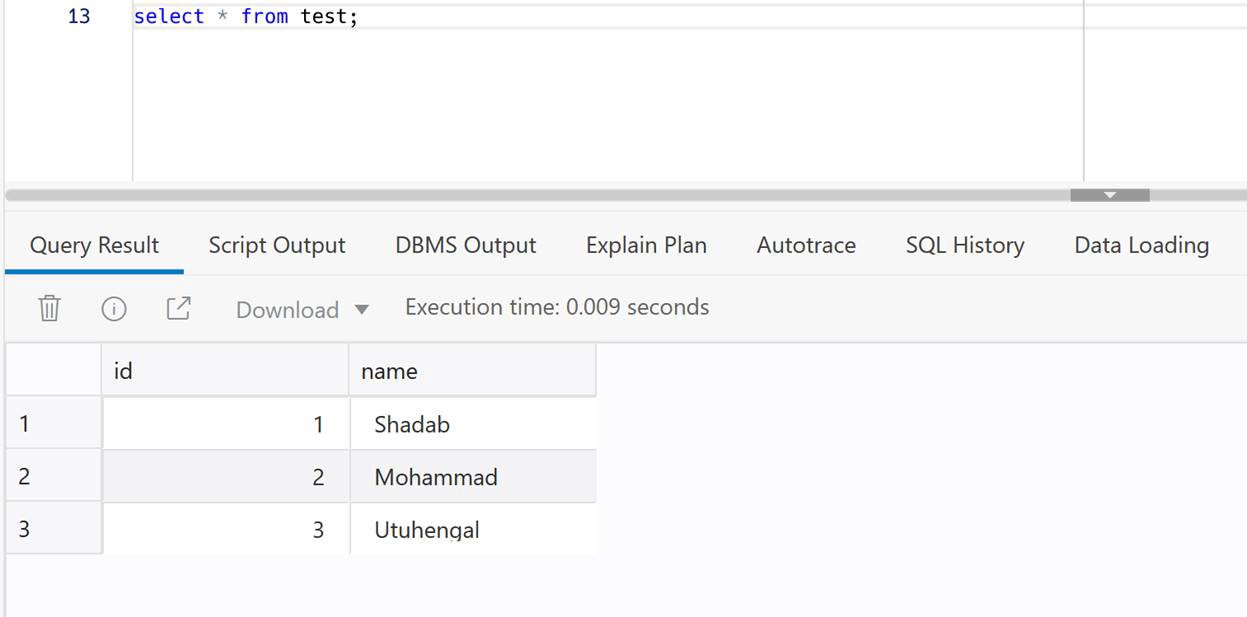
We have created cross-cloud replication from an Oracle Database sitting inside AWS to an Oracle Autonomous Database running on OCI. The idea was to demonstrate the capability and ease of Goldengate Microservices to run a a replication hub on OCI and let you create real-time change data capture across two different public clouds. Every component used in this architecture is a fully managed service without the need of managing any servers or installing any agents on either source or target as they are fully managed cloud services without access to under-lying host.
PostgreSQL is the most popular Open source database and there is a lot of information available when it comes to backing up and restoring PgSQL I have used these scripts to backup production databases and restored them to new Postgres Servers. So here it goes
Backup PostgreSQL Database – Backup_Pgsql.sh
#!/bin/bash
hostname=`hostname`
# Dump DBs
  date=`date +"%Y%m%d_%H%M%N"`
  backupdir='/home/opc'
  dbname='demo'
  filename="$backupdir/${hostname}_${dbname}_${date}"
 pg_dump -U postgres --encoding utf8 -F c -f $filename.dump $dbname
Restore PostgreSQL Database – Restore_Pgsql.sh
#!/bin/bash
# Restore DB
filename='/home/opc/pgimportmaster-demo-20211129_1013.dump'
  pg_restore -U postgres -d demo -c < ./$1
exit 0
Usage for Restore
$ ./Restore_Pgsql.sh pgimportmaster-demo-20211129_1013.dumpCreate Public Accessible Redshift Cluster and Aurora PostgreSQL/ RDS PostgreSQL cluster. The RDS PostgreSQL or Aurora PostgreSQL must be in the same VPC as your Amazon Redshift cluster. If the instance is publicly accessible, configure its security group’s inbound rule to: Type: PostgreSQL, Protocol: TCP, Port Range: 5432, Source: 0.0.0.0/0. Otherwise, if the instance is not publicly accessible, you don’t need to configure an inbound rule.
{
"Version": "2012-10-17",
"Statement": [
{
"Sid": "AccessSecret",
"Effect": "Allow",
"Action": [
"secretsmanager:GetResourcePolicy",
"secretsmanager:GetSecretValue",
"secretsmanager:DescribeSecret",
"secretsmanager:ListSecretVersionIds"
],
"Resource": "arn:aws:secretsmanager:us-east-1:111111111111:secret:federated-query-L9EBau"
},
{
"Sid": "VisualEditor1",
"Effect": "Allow",
"Action": [
"secretsmanager:GetRandomPassword",
"secretsmanager:ListSecrets"
],
"Resource": "*"
}
]
}
CREATE EXTERNAL SCHEMA IF NOT EXISTS myRedshiftSchema
FROM POSTGRES
DATABASE 'testdb' SCHEMA 'aurora_schema'
URI 'federated-cluster-instance-1.c2txxxxupg1.us-east-1.rds.amazonaws.com' PORT 5432
OPTIONS 'application_name=psql'
IAM_ROLE 'arn:aws:iam::1111111111111:role/federated-query-role'
SECRET_ARN 'arn:aws:secretsmanager:us-east-1:11111111111111:secret:federated-query-L9EBau';
testdb=> create schema aurora_schema;
CREATE SCHEMA
testdb=> create table aurora_schema.federatedtable (id int8, name varchar(50), log_txn_date timestamp);
CREATE TABLE
testdb=> insert into aurora_schema.federatedtable values(1,'shadab','2019-12-26 00:00:00');
INSERT 0 1
testdb=> select * from aurora_schema.federatedtable;
id | name | log_txn_date
----+--------+---------------------
1 | shadab | 2019-12-26 00:00:00
(1 row)
testdb=# select * from myredshiftschema.federatedtable;
id | name | log_txn_date
----+--------+---------------------
1 | shadab | 2019-12-26 00:00:00
(1 row)
-- Trying out CTAS from Redshift to PostgreSQL --
testdb=# create table test as select * from myredshiftschema.federatedtable;
SELECT
testdb=# select * from test;
id | name | log_txn_date
----+--------+---------------------
1 | shadab | 2019-12-26 00:00:00
testdb=# select pg_last_query_id();
1251
(1 row)
select * from svl_s3query_summary where query='1251';
-[ RECORD 1 ]-----------+---------------------------
userid | 100
query | 1251
xid | 7338
pid | 11655
segment | 0
step | 0
starttime | 2019-12-27 06:17:30.800652
endtime | 2019-12-27 06:17:30.947853
elapsed | 147201
aborted | 0
external_table_name | PG Subquery
file_format | Text
.
.
.
[1]
Federated Query in Amazon Redshift (Preview) – https://docs.aws.amazon.com/redshift/latest/dg/federated-overview.html
[2]
CREATE EXTERNAL SCHEMA – https://docs.aws.amazon.com/redshift/latest/dg/federated-external-schema.html
[3]
Create a Secret and an IAM Role for Federated Query – https://docs.aws.amazon.com/redshift/latest/dg/federated-create-secret-iam-role.html
#!/bin/bash

sourcefile='/var/www/html/index.html'
remotedir='/var/www/html'
rsyncremotedir='/var/www/'
rsynclocaldir='/var/www/'

### Run Multiple Commands on Remote Host ###
while IFS= read -r dest; do
   ssh -i "mynew_key.pem" $dest '
        date
	sudo yum install rsync
	sudo chown -R ec2-user:root /var/www
	sudo rm -rf /home/ec2-user/ourfile.txt
	ls -ltrh /var/www/html
        hostname' </dev/null
done < hosts.txt

### Transfer File to All Remote Hosts ###
#while IFS= read -r dest; do
#  scp -i "mynew_key.pem" $sourcefile "$dest:$remotedir"
#done <hosts.txt

# Sync Push Local Directory to Remote Hosts Using RSYNC ###
while IFS= read -r dest; do
  rsync -avz /var/www/ --delete --exclude 'stats' -e "ssh -i /home/ec2-user/mynew_key.pem" $dest:/var/www/
done <hosts.txt

# Sync Pull Remote Directory to Local Directory Using RSYNC ###
#while IFS= read -r dest; do
#  rsync -avz --dry-run --delete --exclude 'stats' -e "ssh -i /home/ec2-user/mynew_key.pem" $dest:/var/www/ /var/www/
#done <hosts.txt
Very useful in syncing Apache Web Server directories to multiple hosts when running under AWS ELB
