AWS Lambda Function to Load Data from ‘Requestor Pays’ S3 bucket in One Account to Redshift Cluster in Another Account

Part A : Create Redshift Spectrum Cross-Account Access for S3 


Company Account A: Redshift Cluster Account: 24xxxxxx16
Role: RoleA

Company Account B: S3 Bucket Account: 8xxxxxxxx11
Role: RoleB
Bucket Name (Create with Option “Requestor Pays”): s3://shadmha-us-east-2

Use Case:  1. Read Data from S3 Bucket in different account into Spectrum Table
                   2. Unload Data from Redshift Cluster to S3 bucket in different account

======================================================

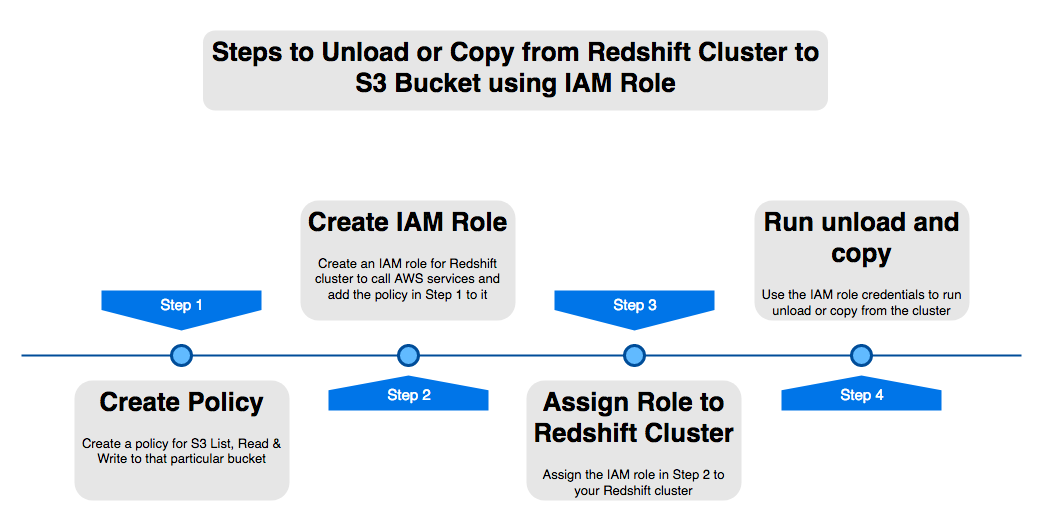
Step 1: In Redshift Cluster Account 24xxxxxx16, do this

a)    Go to IAM > Roles > Create Role
b)    Create Role > Redshift > Redshift – Customizable.
c)    No need to add policies or tags, go ahead and save this role as “RoleA”
d)    Add this role to your Redshift cluster. Goto Redshift Console > Select Cluster > Manage IAM > Add “RoleA” to Cluster

Step 2: In account which has the S3 Bucket Account 8xxxxxxxx11, do this: 

a)    Go to IAM > Policies > Create policy
b)    Select the JSON tab and add below IAM policy, replace my bucket name ‘shadmha-us-east-2’ with your bucket name

{
    “Version”: “2012-10-17”,
    “Statement”: [
        {
            “Effect”: “Allow”,
            “Action”: [
                “s3:GetBucketLocation”,
                “s3:GetObject”,
                “s3:PutObject”,
                “s3:ListMultipartUploadParts”,
                “s3:ListBucket”,
                “s3:ListBucketMultipartUploads”
            ],
            “Resource”: [
                “arn:aws:s3:::shadmha-us-east-2”,
                “arn:aws:s3:::shadmha-us-east-2/*”
            ]
        },
        {
            “Effect”: “Allow”,
            “Action”: [
                “glue:CreateDatabase”,
                “glue:DeleteDatabase”,
                “glue:GetDatabase”,
                “glue:GetDatabases”,
                “glue:UpdateDatabase”,
                “glue:CreateTable”,
                “glue:DeleteTable”,
                “glue:BatchDeleteTable”,
                “glue:UpdateTable”,
                “glue:GetTable”,
                “glue:GetTables”,
                “glue:BatchCreatePartition”,
                “glue:CreatePartition”,
                “glue:DeletePartition”,
                “glue:BatchDeletePartition”,
                “glue:UpdatePartition”,
                “glue:GetPartition”,
                “glue:GetPartitions”,
                “glue:BatchGetPartition”
            ],
            “Resource”: “*”
        }
    ]
}

Chose Review Policy & Save the policy as let’s say ‘s3-cross-account-policy’

c)    Go to Roles > Create Role > Select type of trusted entity as ‘Another AWS Account’ tab
d)    Enter Account ID of Redshift Cluster Account ‘24xxxxxx16’ > Permissions > Search policy created in a)  “s3-cross-account-policy’
e)    Go next > create role > save it as “RoleB”
f)    Go to Roles > Select “RoleB” > “Trust Relationships” tab > Edit trust telationships. Add the below policy:

{
  “Version”: “2012-10-17”,
  “Statement”: [
    {
      “Effect”: “Allow”,
      “Principal”: {
        “AWS”: “arn:aws:iam::24xxxxxx16:root”
      },
      “Action”: “sts:AssumeRole”,
      “Condition”: {}
    }
  ]
}

Update the trust policy

Step 3: Go back to Account under which Redshift Cluster is created

a)    Go to IAM > Roles > Select role which you created earlier “RoleA”
b)    Add inline policy to this role and add the below policy and save it

{
    “Version”: “2012-10-17”,
    “Statement”: [
        {
            “Sid”: “Stmt1487639602000”,
            “Effect”: “Allow”,
            “Action”: [
                “sts:AssumeRole”
            ],
            “Resource”: “arn:aws:iam::80xxxxx11:role/RoleB”
        }
    ]
}
c)    Create policy and Save it to role

Part B: Deploy a Lambda Function Using Attached Code(S3-to-Redshift.zip). And Change Your Cluster and Bucket Details Accordingly

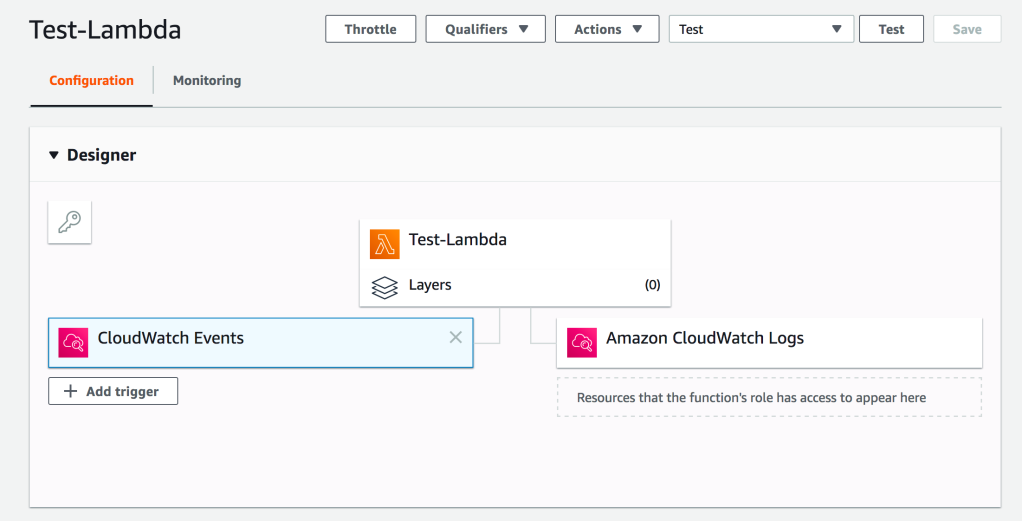
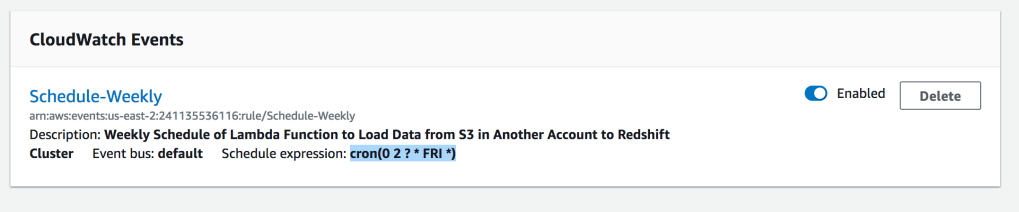
Add a Cloud Watch Event Trigger with Cron Expression : cron(0 2 ? * FRI *)

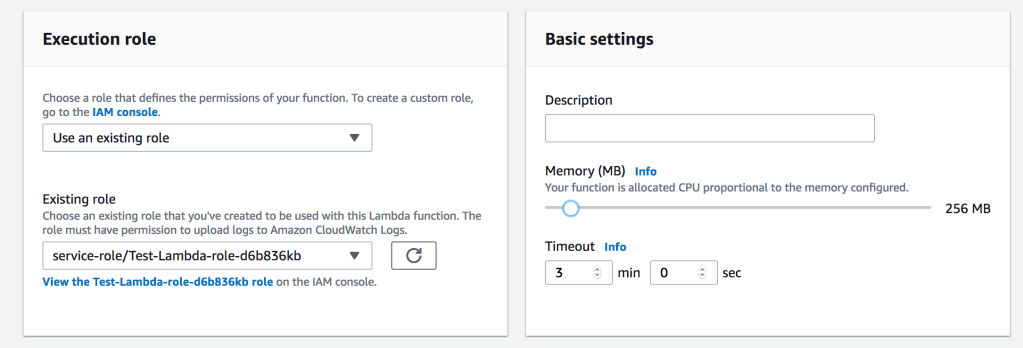
Increase Timeout & Memory of Lambda Function

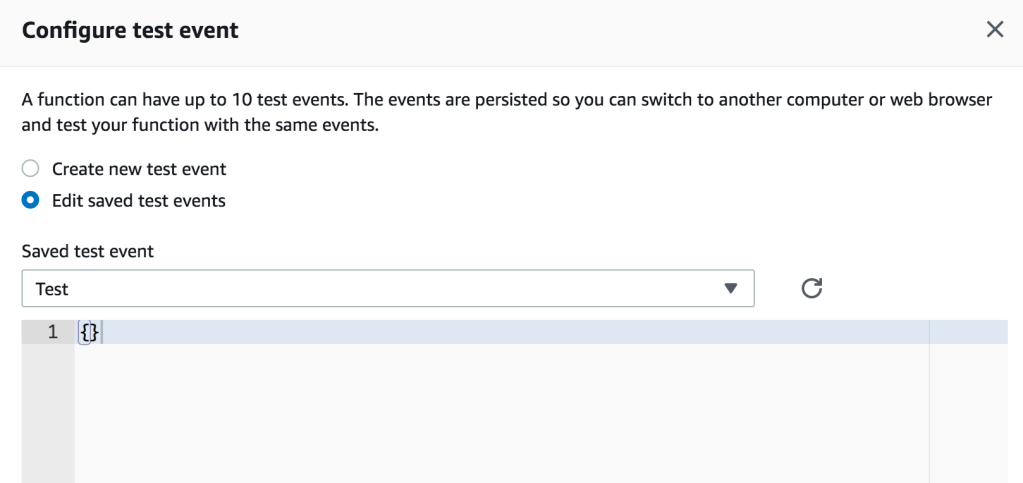
Configure Test Event

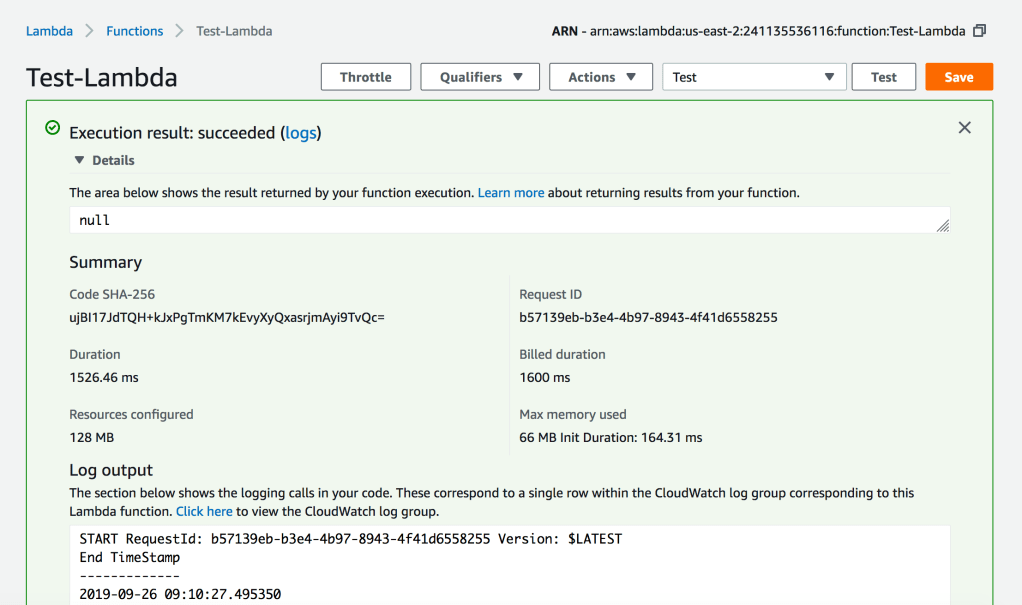
Execute the Lambda Function to Test

Python Code for Lambda Function

#######################################################################################
# Author         :      Shadab Mohammad
# Create Date    :      13-05-2019
# Modified Date  :      26-09-2019
# Name           :      Load Dataset from AWS S3 bucket to your Redshift Cluster
# Dependencies   :      Requires Python 3.6+. Python Libraries required ‘psycopg2’
#######################################################################################
import psycopg2
import csv
import time
import sys
import os
import datetime
from datetime import date
datetime_object = datetime.datetime.now()


print (“###### Load Data From S3 to Redshift ######”)
print (“”)
print (“Start TimeStamp”)
print (“—————“)
print(datetime_object)
print (“”)

def lambda_handler(event, context):
        #Obtaining the connection to RedShift
    con=psycopg2.connect(dbname= ‘testdb’, host=’shadmha-us-east-2.crhzd8dtwytq.us-east-2.redshift.amazonaws.com’, port= ‘5439’, user= ‘awsuser’, password= ‘SomeP@ssword’)

    copy_command_1=”copy connection_log from ‘s3://shadmha-us-east-2/cross-acct-test/connection_events.csv’ delimiter ‘,’ csv iam_role ‘arn:aws:iam::241135536116:role/RoleA,arn:aws:iam::804739925711:role/RoleB’ ignoreheader 1;”

    #Opening a cursor and run truncate query
    cur = con.cursor()
    query= f”’
    DROP TABLE IF EXISTS connection_log CASCADE;

    CREATE TABLE connection_log(
    username varchar(50),
    event varchar(50),
    count int8);
    COMMIT;”’
    cur.execute(query)
    con.commit()

    #Opening a cursor and run copy query
    cur.execute(copy_command_1)
    con.commit()
    #Close the cursor and the connection
    cur.close()
    con.close()

    # Progress Bar Code Ends here

    datetime_object_2 = datetime.datetime.now()
    print (“End TimeStamp”)
    print (“————-“)
    print (datetime_object_2)
    print (“”)

Lambda Function Code : https://github.com/shadabshaukat/serverless/blob/98f42c7867d6eb4d9e602d2b703764ad891fdfed/S3-to-Redshift.zip

Advertisement

Redshift Health-Check SQL Queries

-- Query Performance Review --

$ psql -h redshift-private-2a.c2nh0wlf4z7g.ap-southeast-2.redshift.amazonaws.com -p 5439 -U awsuser -f review_query_pf.sql testdb

$ vim review_query_pf.sql


\o redshiftxxx.txt
\set vpattern 1678
\qecho -- Query Text - stl_explain
select * from stl_querytext where query = :vpattern;
\qecho -- Explain plan - stl_explain
select userid,query,nodeid,parentid,trim(plannode) plannode,trim(info) info from stl_explain where query = :vpattern;
\qecho --Review WLM Queuing for above queries - stl_wlm_query
SELECT TRIM(DATABASE) AS DB,
       w.query,
       SUBSTRING(q.querytxt,1,100) AS querytxt,
       w.queue_start_time,
       w.service_class AS class,
       w.slot_count AS slots,
       w.total_queue_time / 1000000 AS queue_seconds,
       w.total_exec_time / 1000000 exec_seconds,
       (w.total_queue_time + w.total_exec_time) / 1000000 AS total_seconds
FROM stl_wlm_query w
  LEFT JOIN stl_query q
         ON q.query = w.query
        AND q.userid = w.userid
WHERE w.query = :vpattern
--AND w.total_queue_time > 0
ORDER BY w.total_queue_time DESC,
         w.queue_start_time DESC;
\qecho --Get information about commit stats - stl_commit_stats
select startqueue,node, datediff(ms,startqueue,startwork) as queue_time, datediff(ms, startwork, endtime) as commit_time, queuelen
from stl_commit_stats
where xid in (select xid from stl_querytext where query = :vpattern)
order by queuelen desc , queue_time desc;
\qecho --Compile Time
select userid, xid,  pid, query, segment, locus,
datediff(ms, starttime, endtime) as duration, compile
from svl_compile
where query = :vpattern;
--\qecho --Understand other operations within the same PID - svl_statementtext
--select userid,xid,pid,label,starttime,endtime,sequence,type,trim(text) from svl_statementtext where pid in (select pid from stl_querytext where query = :vpattern);
\qecho --Review query work - STL_PLAN_INFO
select * from STL_PLAN_INFO where query = :vpattern;
\qecho --Review query work - svl_query_report
select * from svl_query_report where query = :vpattern order by segment,step,slice;
\qecho --Review query work - svl_query_summary
select * from svl_query_summary where query = :vpattern order by seg,step;
\qecho -- Review alert
select * from stl_alert_event_log where query = :vpattern;
\qecho -- Review STL_ERROR
select userid,process,recordtime,pid,errcode,trim(file),linenum,trim(context),trim(error) from stl_error where recordtime between (select starttime from stl_query where query = :vpattern) and (select endtime from stl_query where query = :vpattern);
\q

Build and store a Hive mestastore outside an EMR cluster in a RDS MySQL database and Connect a Redshift cluster to an EMR cluster

This document addresses the specific configuration points that needs to be in place in order to build and store a Hive mestastore outside an EMR cluster in a RDS MySQL database. It also covers the steps to connect a Redshift cluster to an EMR cluster so Redshift can create and access the tables stored within the external metastore.

Resources Used:

Redshift Cluster

• RDS MySQL Instance

• EMR Cluster

Note: All resources must be in same VPC and same region for this practice.

Creating the RDS MySQL:

1 – First, start creating a RDS MySQL instance if you don’t have one already. Open AWS RDS Console and create an MySQL instance that will be used during this practice.

Note: Please make note of RDS security group, endpoint, Master User and Master Password. We will need that information later on.

2 – Once the RDS MySQL instance is created, modify its security groups to add a rule for All traffic on all Port Range to be allowed from the VPC’s default security group.

Note: This VPC’s default Security Group will be used while creating the EMR cluster later on as well but it needs to be whitelisted beforehand otherwise the EMR launching will fail while trying to reach out to the RDS MySQL.

Before creating the EMR Cluster:

3 – After creating the RDS MySQL (and open its security group to EMR) but right before creating the EMR cluster, a JSON configuration file needs to be created. This file will be ingested by EMR during the bootstrapping phase of EMR’s creation, it will basically tell EMR how to access the remote RDS MySQL database.

4 – Copy the JSON property structure from the following link (use Copy icon): https://docs.aws.amazon.com/emr/latest/ReleaseGuide/emr-hive-metastore-external.html

5 – Paste it in a text editor and modify it carefully with the RDS details you noted earlier.

Note: Be careful, the value property can not contain any spaces or carriage returns. It should appear all on one line. Save it as “hiveConfiguration.json”.

6 – The final JSON configuration file should look like the following:

[
    {
      “Classification”: “hive-site”,
      “Properties”: {

        “javax.jdo.option.ConnectionURL”: “jdbc:mysql:\/\/database-1.cefjr3enh3dk.us-east-2.rds.amazonaws.com:3306\/hive?createDatabaseIfNotExist=true“,      

        “javax.jdo.option.ConnectionDriverName”:”org.mariadb.jdbc.Driver”,
        “javax.jdo.option.ConnectionUserName”:”admin“,

        “javax.jdo.option.ConnectionPassword”: “*********
      }
    }
]

Note 1: replace <hostname>, <username>, <password> with your own details:

Note 2: The part “hive?createDatabaseIfNotExist=true” determines the name of the database to be created in the MySQL RDS, in this case the database will be called “hive”.

7 – After creating above file, upload it to an S3 bucket/folder of your choice (in the same region of your resources).

Creating the EMR:

8 – Now, it is time to create the EMR cluster. To do this, open AWS EMR console and click Create Cluster button. This will prompt the Quick Options page but we won’t be using that. Click on Go to advanced options on the top of the page.

9 – This will send you to the Advanced Options page. There, under Software Configuration, select the following Applications:

Hadoop, Ganglia, Hive, Hue, Tez, Pig, Mahout

10 – In the same page, under Edit Software Settings section, click Load JSON from S3 and select the S3 bucket/path where you uploaded the previous created file “hiveConfiguration.json“. Select the file there and hit Select.

11 – In the Hardware Configuration page, make sure that the EMR cluster is in the same VPC as your MySQL RDS instance. Hit Next if you don’t want to change any Network configuration or Node types.

12 – Hit Next in the General Options page if you don’t want to change anything, although you might want to change the name of your EMR cluster here.

13 – In the next page, Security Options, make sure you have an EC2 Key Pair in that region and select it. Otherwise, create one!

Note: Create one now (if you don’t have one) before creating the EMR as you CAN’T add it later!!!

14 – Still in the Security Options page, expand the EC2 security groups panel and change both, Master and Core & Task instances to use the VPC’s default security group (the same whitelisted in the RDS MySQL security group earlier).

15 – Hit Create cluster and wait the EMR to be created. It will take some time…

Confirming that the metastore was created in the RDS MySQL

16 – Once the EMR is created, another rule needs to be added to the VPC’s default security group, one that allows SSHing into the EMR cluster on port 22 from your local IP. It should look like the following:

17 – With the right rules in place, try to connect to your EMR cluster from your local machine:

– – – chmod 600 article_key.pem 
–   ssh -i article_key.pem hadoop@ec2-18-XX-XX-XX.us-east-2.compute.amazonaws.com

18 – EMR has a MySQL client installed, use this client to connect to your MySQL database and perform few tests such as if the Security Groups are working properly and if the “hive” database was created properly

Note: You can do a telnet test from within EMR box as well to test Security Group access.

19 – To connect to the RDS MySQL, run the following command from your EMR box:

 mysql -h <rds-endpoint> -P 3306 -u <rds master user> -p <rds master password>

Examplemysql -h database-1.cefjr3enh3dk.us-east-2.rds.amazonaws.com -P 3306 -u admin123 -pPwD12345

20 – Once connected, use the following commands to verify if the Hive metastore was indeed created in the RDS. You should be able to see a database named “hive” there:

show databases;       à Lists all databases – “hive” should be there
use hive;             à Connects you to “hive” database
show tables;          à Lists all the meta tables within hive database
select * from TBLS;   à Lists all tables created in hive. At this point there’s none

Setting up necessary Spectrum Roles and Network requirements for Redshift and EMR

Note 1: Following steps assume that you already have a Redshift cluster and that you can connect to it. It will not guide you on how to create and access the Redshift cluster. 

Note 2: Since EMR, RDS MySQL share the same VPC’s default security group, they should be able to communicate to each other already. If that’s the case, you can skip Step 22 and go straight to Step 23, otherwise, If EMR and Redshift use different security groups, please do the step 22 first.

21 – Create a Role for Spectrum and attach it to your Redshift cluster. Follow the instructions here:

•       To Create the Role: https://docs.aws.amazon.com/redshift/latest/dg/c-getting-started-using-spectrum-create-role.html

•       To Associate the Role: https://docs.aws.amazon.com/redshift/latest/dg/c-getting-started-using-spectrum-add-role.html

22 – (Optional) Now that Redshift can access S3, Redshift also needs to access EMR cluster and vice-versa. Follow the steps listed under section “Enabling Your Amazon Redshift Cluster to Access Your Amazon EMR Cluster” in the following link: https://docs.aws.amazon.com/redshift/latest/dg/c-spectrum-external-schemas.html#c-spectrum-enabling-emr-access

Note: In summary, this creates an EC2 security group with Redshift’s Security Group and the EMR’s master node’s security groups inside it. Redshift’s Security Group must allow TCP in every port (0 – 65535) while EMR’s Security Group must allow TCP in port 9083 (Hive’s default). Next, you attach this newly created security group to both of your Redshift and EMR clusters.

23 – Once this is done, you should now be able to create the External Schema in Redshift, query the external tables from Redshift and also be able to create/see the schemas/tables from EMR Hive as well. However, at this point there’s no tables created yet.

Creating Tables on Hive First

24 – Log to Hive console and run the following:

> show databases;
default  (that’s the only database so far)
 
> create external table hive_table (col1 int, col2 string)
ROW FORMAT DELIMITED FIELDS TERMINATED BY ‘|’
location ‘s3://<your_bucket>/<your_folder>/‘;

> show tables;
hive_table  (that’s the table we just created) 

25 – Log back to your MySQL database and run the following commands:

show databases;       à Lists all databases – “hive” should be there
use hive;             à Connects you to “hive” database
show tables;          à Lists all the meta tables within hive database
select * from TBLS;   à  Lists all tables created in hive, “hive_table” is there!

Note: Now you will be able to see the newly created table “hive_table” showing on your External MySQL catalog.

Creating Schemas and Tables on Redshift Now

26 – On Redshift side, an External Schema must be created first before creating or querying the Hive tables, like following:

CREATE EXTERNAL SCHEMA emr_play                     à It can be any name, that’s a schema valid only for Redshift.
FROM HIVE METASTORE DATABASE ‘default’              à Use default database to match the database we have in Hive.  
URI ‘172.XXX.XXX.XXX‘ PORT 9083                     à EMR’s Private IP of the Master Instance. Hive’s default port is 9083.
IAM_ROLE ‘arn:aws:iam::000000000000:role/spectrum‘; à A valid Spectrum Role attached Redshift.

27 – Create the table(s):

create external table emr_play.redshift_table (col1 int, col2 varchar)
ROW FORMAT DELIMITED FIELDS TERMINATED BY ‘|’
location ‘s3://<your_bucket>/<your_folder>/‘;

28 – Simply query the table now:

select * from emr_play.redshift_table;

29 – One more time, log back to your MySQL database and run the following commands again:

show databases;       à Lists all databases – “hive” should be there
use hive;             à Connects you to “hive” database
show tables;          à Lists all the meta tables within hive database
select * from TBLS;   à  Lists all tables created in hive, both tables are there!

 Note: You should be able to see the both Hive and Redshift tables now showing on your External MySQL catalog. You can also query the tables and create new tables on both Hive and Redshift side.

Federated Query from Redshift to Aurora PostgreSQL

Create Public Accessible Redshift Cluster and Aurora PostgreSQL/ RDS PostgreSQL cluster. The RDS PostgreSQL or Aurora PostgreSQL must be in the same VPC as your Amazon Redshift cluster. If the instance is publicly accessible, configure its security group’s inbound rule to: Type: PostgreSQL, Protocol: TCP, Port Range: 5432, Source: 0.0.0.0/0. Otherwise, if the instance is not publicly accessible, you don’t need to configure an inbound rule.

  1. Go to AWS Console > Secrets Manager > Create Secret Managers for RDS Database and Select your PostgreSQL database
  2. Create IAM policy with ARN of above Secrets manager
{
"Version": "2012-10-17",
"Statement": [
{
"Sid": "AccessSecret",
"Effect": "Allow",
"Action": [
"secretsmanager:GetResourcePolicy",
"secretsmanager:GetSecretValue",
"secretsmanager:DescribeSecret",
"secretsmanager:ListSecretVersionIds"
],
"Resource": "arn:aws:secretsmanager:us-east-1:111111111111:secret:federated-query-L9EBau"
},
{
"Sid": "VisualEditor1",
"Effect": "Allow",
"Action": [
"secretsmanager:GetRandomPassword",
"secretsmanager:ListSecrets"
],
"Resource": "*"
}
]
}
  1. Create IAM Redshift customizable role and attach the Above Policy to it.
  2. Attach the Role to your Redshift Cluster
  3. Create External Schema in Redshift
CREATE EXTERNAL SCHEMA IF NOT EXISTS myRedshiftSchema
FROM POSTGRES
DATABASE 'testdb' SCHEMA 'aurora_schema'
URI 'federated-cluster-instance-1.c2txxxxupg1.us-east-1.rds.amazonaws.com' PORT 5432
OPTIONS 'application_name=psql'
IAM_ROLE 'arn:aws:iam::1111111111111:role/federated-query-role'
SECRET_ARN 'arn:aws:secretsmanager:us-east-1:11111111111111:secret:federated-query-L9EBau';
  1. In RDS Aurora PostgreSQL create the schema which will hold the objects for federated query access
testdb=> create schema aurora_schema;
CREATE SCHEMA
testdb=> create table aurora_schema.federatedtable (id int8, name varchar(50), log_txn_date timestamp);
CREATE TABLE
testdb=> insert into aurora_schema.federatedtable values(1,'shadab','2019-12-26 00:00:00');
INSERT 0 1
testdb=> select * from aurora_schema.federatedtable;
id | name | log_txn_date
----+--------+---------------------
1 | shadab | 2019-12-26 00:00:00
(1 row)
  1. Login to your Redshift cluster and Run the Federated Query from Redshift to PostgreSQL —
testdb=# select * from myredshiftschema.federatedtable;
id | name | log_txn_date
----+--------+---------------------
1 | shadab | 2019-12-26 00:00:00
(1 row)
-- Trying out CTAS from Redshift to PostgreSQL --
testdb=# create table test as select * from myredshiftschema.federatedtable;
SELECT
testdb=# select * from test;
id | name | log_txn_date
----+--------+---------------------
1 | shadab | 2019-12-26 00:00:00
testdb=# select pg_last_query_id();
         1251

(1 row)

select * from svl_s3query_summary where query='1251';
-[ RECORD 1 ]-----------+---------------------------
userid | 100
query | 1251
xid | 7338
pid | 11655
segment | 0
step | 0
starttime | 2019-12-27 06:17:30.800652
endtime | 2019-12-27 06:17:30.947853
elapsed | 147201
aborted | 0
external_table_name | PG Subquery
file_format | Text
.
.
.

References:

[1]
Federated Query in Amazon Redshift (Preview) – https://docs.aws.amazon.com/redshift/latest/dg/federated-overview.html
[2]
CREATE EXTERNAL SCHEMA – https://docs.aws.amazon.com/redshift/latest/dg/federated-external-schema.html
[3]
Create a Secret and an IAM Role for Federated Query – https://docs.aws.amazon.com/redshift/latest/dg/federated-create-secret-iam-role.html

Create-Modify-Destroy Redshift Cluster Using Terraform

Devops tool have become quite popular in the last few years. Infrastructure automation tools like Chef, Ansible, Cloudformation and Terraform are increasingly being used to provision cloud infrastructure. Once only used for provisioning compute resources but nowadays due to the agile data analytics organizational need even resources like Data warehouses are being added to the devops cycle. Most of these tools eg: Saltstack, Ansible, Chef, Puppet etc are widely used in the industry one of them stands out among the rest : Terraform.

What makes Terraform different from others including our very own Cloudformation is it’s declarative nature, most of infrastructure automation tools are procedural in nature not declarative. Let me explain the difference between declarative and procedural

 Lets say you want to provision 10 ec2 instances using an automation approach. With a tool like Ansible your template would like something below using a procedural declaration.

 – ec2:
 count: 10
 image: ami-v1
 instance_type: t2.micro

Same code in Terraform using a declarative approach looks like

 resource “aws_instance” “example” {
 count = 10
 ami = “ami-v1”
 instance_type = “t2.micro”
}

The difference is that even though both approaches look similar, lets say you want to add additional 5 servers to the configuration. The ansible code is essentially useless since ansible does not maintain state. For ansible if you change the count and increase it to 15, it will create 15 new additional EC2 instances. Ansible has no way to know what it did in the past. For creating total 15 servers you need to add additional 5.

 – ec2:
 count: 5
 image: ami-v1
 instance_type: t2.micro

With Terraform this is the big game changer. Terraform maintains state of your infrastructure. Terraform is aware of any state it created in the past. Therefore, to deploy additional 5 more servers, all you have to do is go back to the same Terraform template and update the count from 10 to 15:

 resource “aws_instance” “example” {
 count = 15
 ami = “ami-v1”
 instance_type = “t2.micro”
}

When you execute this template Terraform knows it created 10 instances before so it will add only the 5 new instances. With declarative approach the end goal matters. This makes Terraform the winner IMHO from all others. So in this example once we are done with the test , to delete the cluster we just have to run one command without specifying any additional details. Becuase Terraform maintains a record that it created a Redshift cluster with so and so name.

 Let’s now jump in and create a Redshift dc1.large cluster in region ‘us-east-1’ using Terraform

1. Download and Install Terraform for Linux from the Terraform Website : https://www.terraform.io/downloads.html

Note : Install awscli and configure your AWS credentials before we begin

On Linux the download is a zip file containing only 1 file. Unzip to any directory and copy the file ‘terraform’ to /usr/bin

 2. Create a Terraform configuration file in a new directory

 mkdir redshift_tf

 cd redshift_tf

 vim redshift.tf

 provider “aws” {
 region = “us-east-1”
}
resource “aws_redshift_cluster” “default” {
 cluster_identifier = “terraform-rs-cluster”
 database_name = “testdb”
 master_username = “awsuser”
 master_password = “SomePassword1”
 node_type = “dc1.large”
 cluster_type = “single-node”
 skip_final_snapshot = true
}

 3. Initiate Terraform

$ terraform init

 Initializing the backend…

Initializing provider plugins…
– Checking for available provider plugins…
– Downloading plugin for provider “aws” (terraform-providers/aws) 2.14.0…

The following providers do not have any version constraints in configuration,
so the latest version was installed.

To prevent automatic upgrades to new major versions that may contain breaking
changes, it is recommended to add version = “…” constraints to the
corresponding provider blocks in configuration, with the constraint strings
suggested below.

* provider.aws: version = “~&gt; 2.14”

Terraform has been successfully initialized!

 4. Apply Terraform Configuration

Note 1: From Terraform 0.11 and above you do not have to run ‘terraform plan’ command

Note
 2 : For security purpose it is not good practice to store access_key or
 secret_key in the .tf file. If you have installed awscli then Terraform
 will take your AWS credentials from ‘~/.aws/credentials’ or IAM
credentials.

$ terraform apply

 An execution plan has been generated and is shown below.
Resource actions are indicated with the following symbols:
 + create

Terraform will perform the following actions:

 # aws_redshift_cluster.default will be created
 + resource “aws_redshift_cluster” “default” {
 + allow_version_upgrade = true
 + automated_snapshot_retention_period = 1
 + availability_zone = (known after apply)
 + bucket_name = (known after apply)
 + cluster_identifier = “terraform-rs-cluster”
 + cluster_parameter_group_name = (known after apply)
 + cluster_public_key = (known after apply)
 + cluster_revision_number = (known after apply)
 + cluster_security_groups = (known after apply)
 + cluster_subnet_group_name = (known after apply)
 + cluster_type = “single-node”
 + cluster_version = “1.0”
 + database_name = “testdb”
 + dns_name = (known after apply)
 + enable_logging = (known after apply)
 + encrypted = false
 + endpoint = (known after apply)
 + enhanced_vpc_routing = (known after apply)
 + iam_roles = (known after apply)
 + id = (known after apply)
 + kms_key_id = (known after apply)
 + master_password = (sensitive value)
 + master_username = “awsuser”
 + node_type = “dc1.large”
 + number_of_nodes = 1
 + port = 5439
 + preferred_maintenance_window = (known after apply)
 + publicly_accessible = true
 + s3_key_prefix = (known after apply)
 + skip_final_snapshot = false
 + vpc_security_group_ids = (known after apply)
 }

Plan: 1 to add, 0 to change, 0 to destroy.

 aws_redshift_cluster.default: Creation complete after 3m33s [id=terraform-rs-cluster]

Apply complete! Resources: 1 added, 0 changed, 0 destroyed.

 5. Check the state of your infrastructure

You can go
check in your AWS console &gt; Redshift Dashboard and you will see the cluster. To see it from terraform run the below command

$ terraform show

 6. Destroy the Redshift cluster
Like i mentioned in the beginning of this article, the beauty of Terraform is it maintains
state of your infrastructure. You can remove the Redshift cluster by running
 just one simple command

$ terraform destroy

Redshift IAM role for Copy Unload to S3

Creating IAM Policies and Roles & Associating the Role to the Redshift Cluster

———————————————————————————————————

In order to perform operations such as “COPY” and “UNLOAD” to/from a Redshift cluster, the user must provide security credentials that authorize the Amazon Redshift cluster to read data from or write data to your target destination, in this case an Amazon S3 bucket.

Step 1: Creating the policy to allow access on S3

  • On the Services menu, chose IAM  (Under security, Identity & Compliance)
  • On the left side of the IAM Console, go to “Policies” 
  • Select “Create Policy” on the top of the page
  • Select  JSON tab, and paste below in JSON. Replace ‘redshift-testing-bucket-shadmha’ with your bucket name which you are using for unload and copy

 {

   “Version”:”2012-10-17″,

   “Statement”:[

      {

         “Effect”:”Allow”,

         “Action”:[

            “s3:PutObject”,

            “s3:DeleteObject”

         ],

         “Resource”:[

            “arn:aws:s3:::redshift-testing-bucket-shadmha*”

         ]

      },

      {

         “Effect”:”Allow”,

         “Action”:[

            “s3:ListBucket”

         ],

         “Resource”:[

            “arn:aws:s3:::redshift-testing-bucket-shadmha*”

         ]

      }

   ]

  • Click on “Review Policy” and provide “Name” and “Description” for the policy
  • Click “Create Policy” and keep this name handy we will need the name of this policy to add to the IAM role in next step

Step 2: Creating the IAM Role such that the Redshift Service can request it

  • On the left menu of your IAM Console, select “Roles”
  • Select “Create Role” on the top of the page
  • Select type of trusted entity as “AWS Service” > Select the service which will be used for this role as “Amazon Redshift”
  • Select your use case as “Redshift – Customizable Allows Redshift clusters to call AWS services on your behalf.” and click “Permissions”
  • Search the policy that was previously created, select it and click on “Next”
  • Specify a “Role name”
  • Select “Create Role”

Step 3: Associating the created Role to a Redshift Cluster

  • On your AWS Console, on the Services menu, choose “Redshift”
  • On the AWS Redshift console, select the cluster in question and click on “Manage IAM roles”
  • On the pop-up screen, click on the drop box “Available roles” and select the Role created in the previous step
  • Select “Apply changes”

Considerations

——————–

As soon as the “Status” for the IAM role on the “Manage IAM roles” shows as “in-sync”, you can try “COPY” or “UNLOAD” using as CREDENTIALS the created role ARN.

Example:

Note: Modify the details such as schema and table_name, the bucket_name, and “<arn>” to the role ARN (example: “arn:aws:iam::586945000000:role/role_name”), to suit your case scenario.

Below is the example from my test cluster, Role name ‘REDSHIFTNEWROLE’ is one created in Step 2 and S3 bucket ‘redshift-testing-bucket-shadmha’ is the one we assigned policy to in Step 1.

eg:

unload (‘select * from test_char’)

to ‘s3://redshift-testing-bucket-shadmha/test_char.csv’

credentials ‘aws_iam_role=arn:aws:iam::775867435088:role/REDSHIFTNEWROLE’

delimiter ‘|’ region ‘ap-southeast-2’

parallel off:

Most common error associated when trying to copy or unload data from Redshift:

ERROR: S3ServiceException:Access Denied,Status 403,Error AccessDenied

Python Script to Create a Data Pipeline Loading Data From RDS Aurora MySQL To Redshift

In this tutorial we will create a Python script which will build a data pipeline to load data from Aurora MySQL RDS to an S3 bucket and copy that data to a Redshift cluster.

One of the assumptions is you have basic understanding of AWS, RDS, MySQL, S3, Python and Redshift. Even if you don’t it’s alright I will explain briefly about each of them to the non-cloud DBA’s

AWS- Amazon Web Services. It is the cloud infrastructure platform from Amazon which can be used to build and host anything from a static website to a globally scalable service like Netflix

RDS – Relational Database Service or RDS or short is Amazons managed relational database service for databases like it’s own Aurora, MySQL, Postgres, Oracle and SQL Server

S3- Simple Storage Service is AWS’s distributed storage which can scale almost infinitely. Data in S3 is stored in Buckets. Think of buckets as Directories but DNS name compliant and cloud hosted

Python – A programming language which is now the defacto standard for data science and engineering

Redshift- AWS’s Petabyte scale Data warehouse which is binary compatible to PostgreSQL but uses a columnar storage engine

The source in this tutorial is a RDS Aurora MySQL database and target is a Redshift cluster. The data is staged in an S3 bucket. With Aurora MySQL you can unload data directly to a S3 bucket but in my script I will offload the table to a local filesystem and then copy it to the S3 bucket. This will give you flexibility in-case you are not using Aurora but a standard MySQL or Maria DB

Environment:

  1. Python 3.7.2 with pip
  2. Ec2 instance with the Python 3.7 installed along with all the Python packages
  3. Source DB- RDS Aurora MySQL 5.6 compatible
  4. Destination DB – Redshift Cluster
  5. Database : Dev , Table : employee in both databases which will be used for the data transfer
  6. S3 bucket for staging the data
  7. AWS Python SDK Boto3

Make sure both the RDS Aurora MySQL and Redshift cluster has security groups which have have IP of the Ec2 instance for inbound connections (Host and Port)

  1. Create the table ’employee’ in both the Aurora and Redshift Clusters

Aurora MySQL 5.6

CREATE TABLE `employee` (
  `id` int(11) NOT NULL,
  `first_name` varchar(45) DEFAULT NULL,
  `last_name` varchar(45) DEFAULT NULL,
  `phone_number` varchar(45) DEFAULT NULL,
  `address` varchar(200) DEFAULT NULL,
  PRIMARY KEY (`id`)
) ENGINE=InnoDB DEFAULT CHARSET=latin1;

Redshift

DROP TABLE IF EXISTS employee CASCADE;

CREATE TABLE employee
(
   id            bigint         NOT NULL,
   first_name    varchar(45),
   last_name     varchar(45),
   phone_number  bigint,
   address       varchar(200)
);

ALTER TABLE employee
   ADD CONSTRAINT employee_pkey
   PRIMARY KEY (id);

COMMIT;

2. Install Python 3.7.2 and install all the packages needed by the script

sudo /usr/local/bin/python3.7 -m pip install boto3
sudo /usr/local/bin/python3.7 -m pip install psycopg2-binary
sudo /usr/local/bin/python3.7 -m pip install pymysql
sudo /usr/local/bin/python3.7 -m pip install json
sudo /usr/local/bin/python3.7 -m pip install pymongo

3. Insert sample data into the source RDS Aurora DB

$ mysql -u awsuser -h shadmha-cls-aurora.ap-southeast-2.rds.amazonaws.com -p dev

INSERT INTO `employee` VALUES (1,'shadab','mohammad','04447910733','Randwick'),(2,'kris','joy','07761288888','Liverpool'),(3,'trish','harris','07766166166','Freshwater'),(4,'john','doe','08282828282','Newtown'),(5,'mary','jane','02535533737','St. Leonards'),(6,'sam','rockwell','06625255252','Manchester');

SELECT * FROM employee;

4. Download and Configure AWS command line interface

The AWS Python SDK boto3 requires AWS CLI for the credentials to connect to your AWS account. Also for uploading the file to S3 we need boto3 functions. Install AWS CLI on Linux and configure it.

$ aws configure
AWS Access Key ID [****************YGDA]:
AWS Secret Access Key [****************hgma]:
Default region name [ap-southeast-2]:
Default output format [json]:

5. Python Script to execute the Data Pipeline (datapipeline.py)

import boto3
import psycopg2
import pymysql
import csv
import time
import sys
import os
import datetime
from datetime import date
datetime_object = datetime.datetime.now()
print ("###### Data Pipeline from Aurora MySQL to S3 to Redshift ######")
print ("")
print ("Start TimeStamp")
print ("---------------")
print(datetime_object)
print ("")


# Connect to MySQL Aurora and Download Table as CSV File
db_opts = {
    'user': 'awsuser',
    'password': '******',
    'host': 'shadmha-cls-aurora.ap-southeast-2.rds.amazonaws.com',
    'database': 'dev'
}

db = pymysql.connect(**db_opts)
cur = db.cursor()

sql = 'SELECT * from employee'
csv_file_path = '/home/centos/my_csv_file.csv'

try:
    cur.execute(sql)
    rows = cur.fetchall()
finally:
    db.close()

# Continue only if there are rows returned.
if rows:
    # New empty list called 'result'. This will be written to a file.
    result = list()

    # The row name is the first entry for each entity in the description tuple.
    column_names = list()
    for i in cur.description:
        column_names.append(i[0])

    result.append(column_names)
    for row in rows:
        result.append(row)

    # Write result to file.
    with open(csv_file_path, 'w', newline='') as csvfile:
        csvwriter = csv.writer(csvfile, delimiter='|', quotechar='"', quoting=csv.QUOTE_MINIMAL)
        for row in result:
            csvwriter.writerow(row)
else:
    sys.exit("No rows found for query: {}".format(sql))


# Upload Generated CSV File to S3 Bucket
s3 = boto3.resource('s3')
bucket = s3.Bucket('mybucket-shadmha')
s3.Object('mybucket-shadmha', 'my_csv_file.csv').put(Body=open('/home/centos/my_csv_file.csv', 'rb'))


#Obtaining the connection to RedShift
con=psycopg2.connect(dbname= 'dev', host='redshift-cluster-1.ap-southeast-2.redshift.amazonaws.com',
port= '5439', user= 'awsuser', password= '*********')

#Copy Command as Variable
copy_command="copy employee from 's3://mybucket-shadmha/my_csv_file.csv' credentials 'aws_iam_role=arn:aws:iam::775888:role/REDSHIFT' delimiter '|' region 'ap-southeast-2' ignoreheader 1 removequotes ;"

#Opening a cursor and run copy query
cur = con.cursor()
cur.execute("truncate table employee;")
cur.execute(copy_command)
con.commit()

#Close the cursor and the connection
cur.close()
con.close()

# Remove the S3 bucket file and also the local file
DelLocalFile = 'aws s3 rm s3://mybucket-shadmha/my_csv_file.csv --quiet'
DelS3File = 'rm /home/centos/my_csv_file.csv'
os.system(DelLocalFile)
os.system(DelS3File)


datetime_object_2 = datetime.datetime.now()
print ("End TimeStamp")
print ("-------------")
print (datetime_object_2)
print ("")

6. Run the Script or Schedule in Crontab as a Job

$ python3.7 datapipeline.py

Crontab to execute Job daily at 10:30 am

30 10 * * * /usr/local/bin/python3.7 /home/centos/datapipeline.py &>> /tmp/datapipeline.log

7. Check the table in destination Redshift Cluster and all the records should be visible their

SELECT * FROM employee;


This tutorial was done using a small table and very minimum data. But with S3’s distributed nature and massive scale and Redshift as a Data warehouse you can build data pipelines for very large datasets. Redhsift being an OLAP database and Aurora OLTP, many real-life scenarios requires offloading data from your OLTP apps to data warehouses or data marts to perform Analytics on it.

AWS also has an excellent managed solution called Data Pipelines which can automate the movement and transform of Data. But many a times for developing customized solutions Python is the best tool for the job.

Enjoy this script and please let me know in your comments or on Twitter (@easyoradba) if you have any issues or what else would you like me to post for data engineering.

Simple Script to Connect & Query AWS Redshift from Python 3.7

Pre-requisite

You need psycopg2 adapter for Python which is compatible with any PostgreSQL database

To install psycopg2

$ sudo python3.7 -m pip install psycopg2

Sometimes it gives an error when you install from the source, in that case you can install from the binary

$ sudo python3.7 -m pip install psycopg2-binary

import psycopg2

#Obtaining the connection to RedShift
con=psycopg2.connect(dbname= 'dev', host='your-redshift-cluster.redshift.amazonaws.com',
port= '5439', user= 'YourUser', password= 'YourPassword')

#Opening a cursor and running a query
cur = con.cursor()
cur.execute("SELECT SYSDATE;")
#Printing the output
print(cur.fetchall())
cur.close()
con.close()

Output:

[(datetime.datetime(2019, 4, 18, 23, 57, 0, 289196),)]

AWS Reshift Insert into Table without S3

To generate random data into a table without using S3 for doing some quick tests

drop table if exists seed;

create table seed ( n int8 );

insert into seed (
SELECT
p0.n
+ p1.n*2
+ p2.n * POWER(2,2)
+ p3.n * POWER(2,3)
+ p4.n * POWER(2,4)
+ p5.n * POWER(2,5)
+ p6.n * POWER(2,6)
+ p7.n * POWER(2,7)
as number
FROM
(SELECT 0 as n UNION SELECT 1) p0,
(SELECT 0 as n UNION SELECT 1) p1,
(SELECT 0 as n UNION SELECT 1) p2,
(SELECT 0 as n UNION SELECT 1) p3,
(SELECT 0 as n UNION SELECT 1) p4,
(SELECT 0 as n UNION SELECT 1) p5,
(SELECT 0 as n UNION SELECT 1) p6,
(SELECT 0 as n UNION SELECT 1) p7
Order by 1
);

commit;

drop table if exists test_table;

create table test_table(
ingest_time timestamp encode zstd,
doi date encode zstd,
id int encode bytedict,
value float encode zstd,
data_sig varchar(32) encode zstd
) DISTKEY(id) SORTKEY(ingest_time);

commit;

insert into test_table (
select dateadd(‘msec’, – 10n , getdate() ) as ingest_time, trunc(dateadd(‘msec’, – 10n , getdate() )) as doi,id,
n::float / 1000000 as value, ‘sig-‘ || to_hex(n % 16) as data_sig
FROM (select (a.n + b.n + c.n + d.n) as n, (random() * 1000)::int as id from seed a cross join (select n256 as n from seed) b cross join (select n65536 as n from seed) c
cross join (select n*16777216 as n from ( select distinct (n/16)::int as n from seed ) ) d)
) order by ingest_time;

commit;

analyze test_table;

select count(*) from test_table;

–Consecutive run on of above insert query will 268 million rows for each execution–

You can create a table with about 1 billion rows in 8 minutes on a ds2.xlarge cluster